Shower wall panelling ideas combine material selection, colour schemes, layout strategies, and enclosure compatibility to create waterproof, grout-free shower surfaces using PVC, acrylic, laminate, or composite panels across 2400–2700 mm heights and 4–15 mm thickness ranges.
Shower wall panelling replaces tiled surfaces with seamless systems that improve moisture resistance, reduce maintenance, and support installation within 1–2 days. Panel types include PVC, acrylic, laminate, and composite boards, each offering different durability levels and finish quality. Design strategies vary by bathroom size, with small bathrooms using light tones, vertical layouts, and minimal patterns to increase perceived space, while large ensuites use feature walls, dual-tone contrasts, and textured finishes to define zones.
Colour schemes influence brightness and depth through combinations such as light neutrals, monochrome contrasts, marble-effect finishes, and warm tones. Complementary floor pairings and enclosure types such as quadrant, sliding, hinged, and walk-in systems integrate with panelled walls to maintain waterproof performance. Installation cost varies by material type, while durability ranges between 10–20 years depending on maintenance and panel composition.
What Is Shower Wall Panelling?
Shower wall panelling is a waterproof wall cladding system made from PVC, acrylic, laminate, or composite boards that protects shower walls from moisture while delivering seamless, grout-free surfaces across panel sizes between 2400–2700 mm height and 600–1000 mm width. Shower wall panelling replaces tiled surfaces by forming a continuous barrier against water ingress. Panel construction includes rigid cores and decorative layers that maintain durability under constant exposure.

Waterproof Structure
Shower wall panelling uses non-porous materials that block water penetration across shower zones. Surface layers prevent moisture absorption and reduce mould formation. Waterproof structure supports long-term performance in wet environments.
Material Composition
Shower wall panelling includes PVC, acrylic, laminate, and composite materials with thickness ranges between 4–15 mm. Material density improves durability and impact resistance. Surface layers maintain finish quality under regular water exposure.
Panel Dimensions
Shower wall panelling installs in large sheets between 2400–2700 mm height and 600–1000 mm width. Large formats reduce joint lines and improve installation speed. Panel sizing supports full wall coverage.
Seamless Surface
Shower wall panelling creates grout-free surfaces using tongue-and-groove or flush joint systems. Seamless structure reduces dirt accumulation and improves hygiene. Continuous surfaces enhance visual consistency.
Installation Method
Shower wall panelling fixes using adhesive bonding or mechanical fixing depending on substrate condition. Installation completes within 1–2 days for standard shower areas. Reduced installation time improves efficiency.
Surface Finishes
Shower wall panelling replicates marble, stone, and tile finishes through printed or laminated surfaces. Decorative layers maintain appearance without grout lines. Finish options support multiple design styles.
What Are Primary Benefits Of Wall Panelling?
Wall panelling provides 6 primary benefits including waterproof protection, fast installation, low maintenance, seamless finish, durability, and cost efficiency, improving wall performance across moisture resistance, hygiene control, and installation time within 1–2 days.
The primary benefits of wall panelling are given below:
- Provide Waterproof Protection: Wall panelling creates non-porous surfaces that block water penetration and reduce mould growth in wet areas.
- Enable Fast Installation: Wall panelling installs within 1–2 days using large panels sized 2400–2700 mm, reducing labour time compared to tiling.
- Reduce Maintenance Needs: Wall panelling eliminates grout lines, lowering cleaning frequency and preventing dirt accumulation.
- Create Seamless Finish: Wall panelling forms continuous surfaces with minimal joints, improving hygiene and visual consistency.
- Ensure Long-Term Durability: Wall panelling uses materials such as PVC, laminate, or composite cores that resist impact and wear over time.
- Improve Cost Efficiency: Wall panelling reduces labour and maintenance costs compared to traditional tiled wall systems.
What Are The Different Types Of Shower Wall Panelling Available In The UK?
Shower wall panelling types in the UK include 5 main material categories: PVC panels, acrylic panels, laminate panels, composite panels, and MDF-backed panels, each offering different durability levels, waterproof performance, thickness ranges, and installation suitability for shower environments. Shower panels vary based on core construction, surface finish, and moisture resistance. Material choice influences lifespan, maintenance, rigidity, and compatibility with wet areas.

PVC Panels
PVC wall panels use polyvinyl chloride material with lightweight construction and thickness around 5–10 mm. PVC panels provide full waterproof protection and easy installation through tongue-and-groove systems. PVC panels are widely used due to low cost and simple handling.
Acrylic Panels
Acrylic shower panels use solid acrylic sheets with thickness around 4–8 mm and a dense structure. Acrylic panels deliver high-gloss, glass-like finishes with strong water resistance. Acrylic panels provide smooth surfaces and improved visual clarity.
Laminate Panels
Laminate shower panels use high-pressure laminate (HPL) bonded to MDF or plywood cores with thickness between 8–12 mm. Laminate panels replicate marble, stone, or tile finishes with strong durability. Laminate construction improves rigidity and impact resistance.
Composite Panels
Composite shower panels combine multiple materials such as aluminium layers and polymer cores with thickness between 10–15 mm. Composite panels provide high strength, stability, and moisture resistance. Composite construction supports long-term durability in high-use shower areas.
MDF Backed Panels
MDF-backed shower panels use moisture-resistant MDF cores with decorative laminate surfaces. MDF panels provide structural strength and smooth finishes. MDF-backed panels require proper sealing to maintain waterproof performance in wet zones.
Decorative Finish Panels
Decorative shower panels include tile-effect, marble-effect, and stone-effect surfaces applied across PVC, laminate, or composite bases. Decorative panels replicate traditional materials while maintaining waterproof, grout-free surfaces. Finish variation supports design flexibility in modern bathrooms.
How Do PVC Shower Panels Compare To Tile And Other Materials?
PVC shower panels provide faster installation, full waterproof protection, lower maintenance, and reduced overall cost compared to tiles and other materials, while tiles offer higher design flexibility and longer lifespan with greater maintenance requirements. PVC shower panels differ from tiles and alternative materials such as laminate or acrylic through installation method, surface structure, and maintenance demands. Panels create continuous, non-porous surfaces with minimal joints, while tiles rely on grout lines that require sealing and maintenance.
The comparison between PVC shower panels, tiles, and other materials is given below:
- Provide Faster Installation: PVC shower panels install up to 70% faster than tiles due to large sheet formats and no grouting process. Tile installation requires multi-stage fixing, grouting, and curing over several days.
- Ensure Waterproof Surface: PVC panels form a continuous waterproof layer with minimal joints, reducing water ingress risk. Tiles depend on grout sealing, where cracks or wear allow moisture penetration over time.
- Reduce Maintenance Needs: PVC panels require simple wipe cleaning with no grout maintenance. Tiles require regular grout cleaning, resealing, and mould removal due to porous joints.
- Lower Installation Cost: PVC panels reduce labour cost due to faster installation and fewer materials. Tile systems increase cost through longer labour time and additional materials such as grout and sealants.
- Improve Hygiene Performance: PVC panels provide non-porous, grout-free surfaces that limit bacteria and mould buildup. Tile grout lines create multiple points for dirt and microbial accumulation.
- Offer Moderate Durability: PVC panels resist impact, moisture, and daily wear effectively. Tiles provide higher long-term lifespan and heat resistance when properly maintained.
- Limit Design Flexibility: PVC panels offer consistent finishes such as marble or stone effects across large surfaces. Tiles allow complex layouts, patterns, and custom design configurations.
What Are The Best Shower Wall Panelling For Small Bathrooms?
The best shower wall panelling ideas for small bathrooms focus on 7 design strategies including light-reflective finishes, vertical layouts, feature walls, minimal patterns, seamless surfaces, texture variation, and space-enhancing colours to visually expand compact shower areas. Shower wall panelling improves small bathroom design by reducing visual clutter, increasing light reflection, and creating continuous waterproof surfaces.
The best shower wall panelling ideas for small bathrooms are given below:
- Use Glossy Light Panels: Glossy white or light grey panels reflect light across surfaces, making compact bathrooms appear larger and brighter. Reflective finishes improve visibility and reduce shadow areas.
- Use Marble Effect Panels: Marble-effect panels with white or light veining create a luxury look while maintaining brightness. Light marble finishes enhance depth without darkening the space.
- Apply Vertical Panels: Vertical panel layouts draw the eye upward, increasing perceived ceiling height. Slatted or linear designs create visual elongation in narrow shower spaces.
- Create Feature Wall: Use one bold panel wall inside the shower area while keeping surrounding walls neutral. Feature walls add depth without overwhelming limited space.
- Use Seamless Large Panels: Large panels between 2400–2700 mm reduce joint lines and visual breaks. Fewer seams create a continuous surface that enhances spatial flow.
- Choose Minimal Matte Finishes: Matte panels reduce glare while maintaining a clean and modern look. Neutral matte tones support subtle design without visual clutter.
- Add Texture Selectively: Stone-effect or textured panels create depth when used on a single wall. Controlled texture prevents overcrowding while adding visual interest.
- Use Horizontal Patterns Carefully: Horizontal panel designs widen the appearance of narrow bathrooms when applied in balanced proportions. Excessive horizontal patterns reduce height perception.
- Combine Light And Neutral Tones: Light beige, cream, and soft grey panels maintain brightness while adding warmth. Balanced colour schemes improve overall spatial perception.
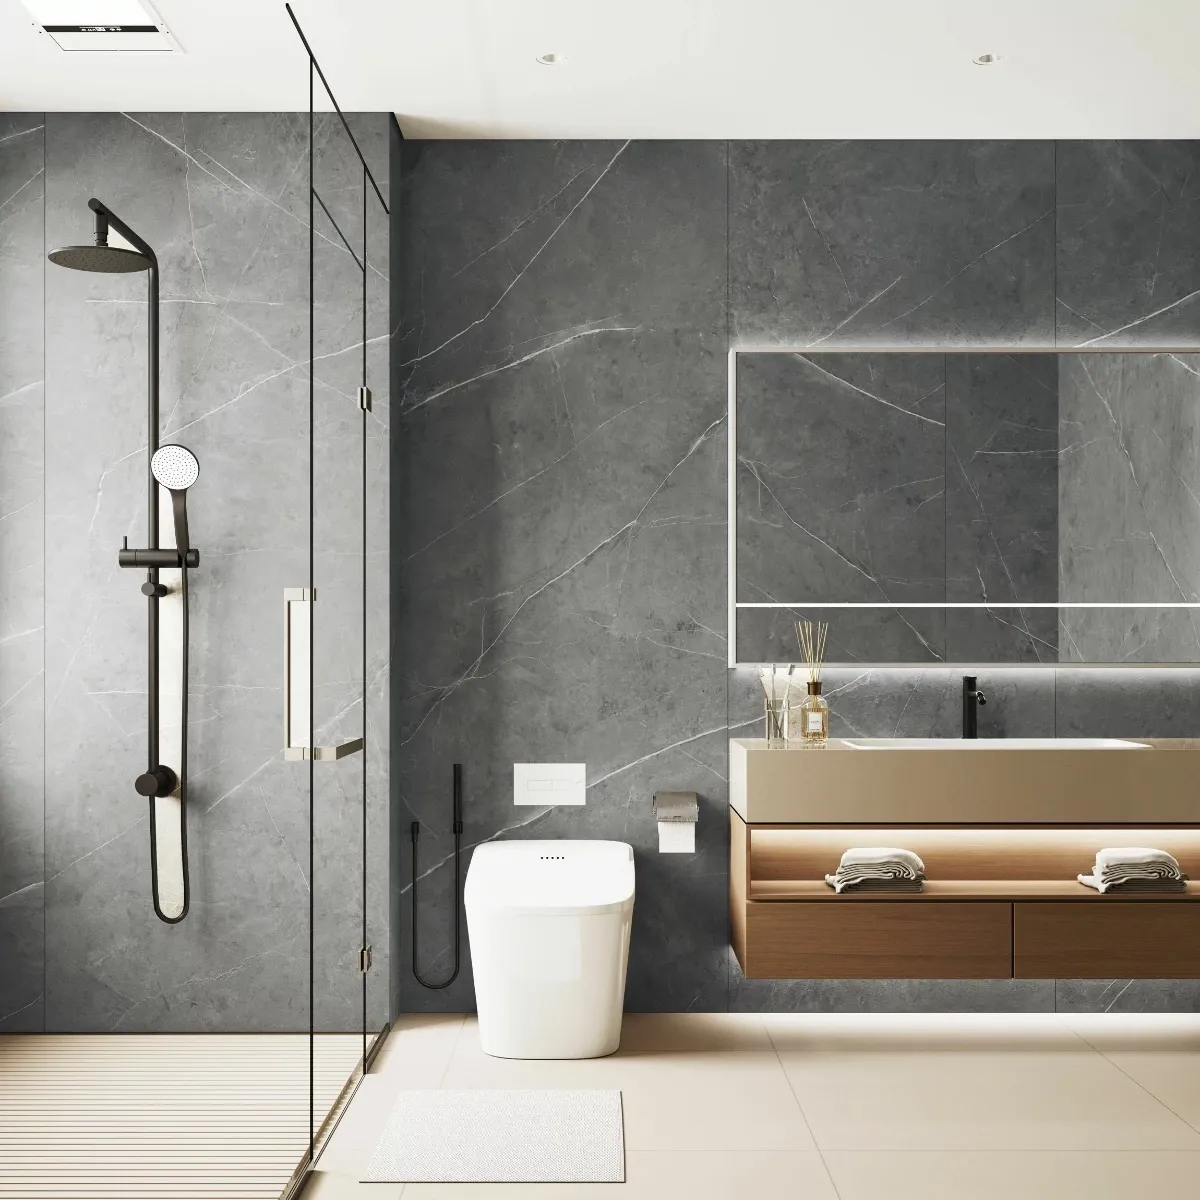
What Are The Best Shower Wall Panelling Ideas For Large Ensuites?
The best shower wall panelling ideas for large ensuites include 7 design strategies such as full-height feature panels, dual-tone zoning, large-format panels, bold textures, marble statement finishes, multi-outlet framing, and contrast layouts to enhance scale, depth, and visual structure across areas exceeding 10–15 m². Shower wall panelling in large ensuites focuses on defining zones, adding visual weight, and maintaining balance across wider wall surfaces.
The best shower wall panelling ideas for large ensuites are given below:
- Use Full-Height Feature Panels: Install full-height panels between 2400–2700 mm with bold finishes such as marble or stone. Large vertical surfaces create strong visual impact and define shower zones clearly.
- Apply Dual-Tone Panels: Combine two panel colours such as dark grey with light beige to create contrast across walls. Dual-tone layouts divide large spaces into functional visual zones.
- Install Large-Format Panels: Use wide panels between 900–1000 mm to reduce joints and create expansive seamless surfaces. Larger formats enhance spatial continuity and reduce visual interruption.
- Use Bold Texture Panels: Apply textured panels such as slate or stone effect to add depth across large surfaces. Texture prevents flat appearance in wide shower areas.
- Create Marble Statement Walls: Use marble-effect panels with strong veining as focal walls. Statement finishes add luxury and visual hierarchy within large ensuites.
- Frame Multi-Outlet Showers: Use panel layouts to frame rainfall showers, body jets, or handsets. Structured framing highlights functional shower zones within open layouts.
- Use Contrast Edge Detailing: Apply darker trims or borders around panel edges to define boundaries. Contrast detailing improves visual structure across large wall areas.
- Combine Matte And Gloss Finishes: Use matte panels on larger areas and gloss panels on feature sections. Mixed finishes create depth and reflect light selectively.
- Extend Panels Across Zones: Continue panel finishes from shower areas to surrounding walls for unified design. Continuous surfaces improve flow across large ensuite layouts.
What Colour Schemes Work Best For Shower Wall Panelling?
The best colour schemes for shower wall panelling include 6 structured combinations such as light neutrals, monochrome contrasts, warm earthy tones, marble-effect whites, dark feature tones, and soft pastels, optimising brightness, depth, and spatial balance across shower areas. Shower wall panelling colour schemes influence light reflection, perceived space, and overall bathroom atmosphere.

The colour schemes for shower wall panelling are given below:
- Use Light Neutral Tones: Light colours such as white, cream, and soft grey increase brightness and reflect light across surfaces. Light tones improve spatial perception in compact shower areas.
- Apply Monochrome Contrast: Combine black and white panels to create sharp visual contrast. Monochrome schemes define shower zones and add structured design impact.
- Use Warm Earthy Colours: Beige, taupe, and sand tones create a warm and natural appearance. Earthy colours maintain balance and reduce visual harshness.
- Install Marble Effect White Panels: White marble panels with grey veining provide a high-end aesthetic while maintaining brightness. Marble finishes enhance depth without darkening the space.
- Use Dark Feature Panels: Dark tones such as charcoal, navy, or black create focal walls within larger shower areas. Dark panels add depth when balanced with lighter surroundings.
- Apply Soft Pastel Shades: Light blue, sage green, or blush tones introduce subtle colour variation. Pastel schemes maintain brightness while adding visual softness.
- Combine Two-Tone Layouts: Pair light and dark panels to divide vertical or horizontal zones. Two-tone schemes improve visual structure and depth.
- Use Matte And Gloss Mix: Combine matte finishes with gloss panels to control light reflection. Mixed finishes create layered visual effects across surfaces.
- Match With Fixtures: Align panel colours with fixtures such as chrome, black, or brass finishes. Coordinated colour schemes improve overall design consistency.
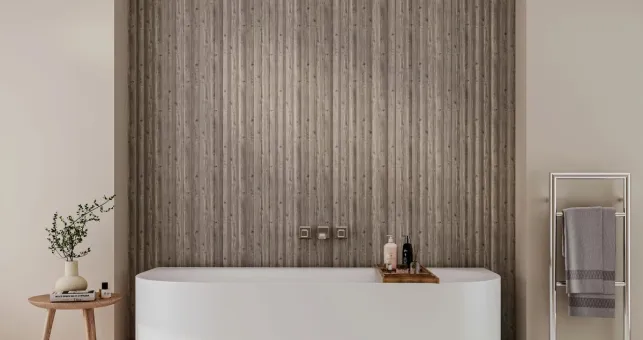
What Are The Best Marble-Effect Bathroom Wall Panelling?
The best marble-effect shower wall panelling includes 6 high-performing types such as Carrara marble panels, Calacatta marble panels, grey marble panels, onyx-effect panels, textured marble panels, and tile-effect marble panels, each delivering waterproof performance, seamless surfaces, and realistic stone aesthetics. Marble-effect bathroom wall panels replicate natural stone patterns while eliminating weight, porosity, and maintenance associated with real marble.
Carrara Marble Panels
Carrara marble panels use a white base with soft grey veining to create a clean and timeless appearance. Light tones improve brightness and spatial perception. Carrara panels suit small and medium shower areas requiring neutral finishes.
Calacatta Marble Panels
Calacatta marble panels feature bold veining with higher contrast against white backgrounds. Strong patterns create feature walls within shower spaces. Calacatta panels suit large bathrooms requiring visual impact.
Grey Marble Panels
Grey marble panels use mid to dark grey tones with subtle or bold veining patterns. Grey finishes provide balanced contrast without overwhelming the space. Grey marble panels suit modern and monochrome shower designs.
Onyx Effect Panels
Onyx-effect panels replicate layered stone patterns with multi-tone colour variation such as gold, green, or black. Translucent-style designs add depth and luxury appearance. Onyx panels create statement shower walls.
Textured Marble Panels
Textured marble panels include embossed or grooved surfaces that add depth and tactile variation. Textures improve light diffusion and reduce flat appearance. Textured panels suit feature sections within shower areas.
What Are Complementary Wall Panelling And Floor Combinations?
Complementary wall panelling and floor combinations align colour, texture, and material contrast across 5 structured pairings including light walls with dark floors, marble walls with neutral floors, textured walls with smooth floors, monochrome schemes, and warm-tone pairings to create balanced bathroom design. Wall and floor combinations influence visual depth, spatial perception, and design continuity within shower areas.
The complementary wall panelling and floor combinations are given below:
- Use Light Walls With Dark Floors: Light wall panels such as white or cream paired with dark grey or black flooring create strong contrast. This combination defines boundaries and enhances depth.
- Use Marble Walls With Neutral Floors: Marble-effect wall panels combined with beige, light grey, or stone-effect flooring maintain a balanced and natural aesthetic. Neutral floors support marble veining without visual conflict.
- Use Textured Walls With Smooth Floors: Textured wall panels such as stone or slate paired with smooth floor finishes create contrast in surface feel. This combination prevents visual overcrowding.
- Apply Monochrome Schemes: Black and white wall panels combined with matching or contrasting floors create structured and modern designs. Monochrome layouts improve visual consistency.
- Use Warm Tone Pairings: Beige, taupe, or sand-coloured panels paired with wood-effect or warm-toned flooring create a cohesive and natural environment. Warm tones improve comfort and visual softness.
- Combine Matte Walls With Gloss Floors: Matte wall panels paired with gloss flooring surfaces create light variation and visual layering. Mixed finishes enhance depth and reflectivity.
- Use Seamless Colour Matching: Matching wall and floor tones create a continuous surface effect that increases perceived space. Seamless colour combinations suit compact bathrooms.
- Contrast Feature Floor: Neutral wall panels combined with patterned or bold flooring create focal points at floor level. This combination adds visual interest without overwhelming walls.
How Do Different Shower Enclosure Types Work With Panelled Walls?
Different shower enclosure types integrate with panelled walls through 5 configurations including quadrant, sliding, hinged, walk-in, and bi-fold enclosures, each requiring sealed panel joints, accurate alignment, and stable fixing to maintain waterproof performance across 0.2–5 bar systems. Panelled walls provide a flat, non-porous substrate that supports enclosure fixing and sealing.
The compatibility between shower enclosure types and panelled walls is given below:
- Use Quadrant Enclosures: Quadrant enclosures fit into corner spaces using curved glass panels. Panelled walls support corner alignment and require sealed joints along curved edges to maintain waterproof coverage.
- Use Sliding Door Enclosures: Sliding enclosures operate on horizontal tracks and require flat panel surfaces for stable frame fixing. Panelled walls provide smooth backing for track alignment and consistent door movement.
- Use Hinged Door Enclosures: Hinged enclosures require strong fixing points on panelled walls to support door weight. Reinforced wall backing ensures secure hinge installation and prevents panel stress.
- Use Walk-In Enclosures: Walk-in enclosures use open-entry designs with minimal framing. Panelled walls provide continuous waterproof coverage behind fixed glass panels, requiring edge sealing for splash control.
- Use Bi-Fold Enclosures: Bi-fold enclosures fold inward to save space and require precise alignment on panelled walls. Flat panel surfaces support hinge operation and frame positioning.
- Ensure Proper Sealing: All enclosure types require silicone sealing between frames and panel surfaces to prevent water leakage. Continuous sealing ensures waterproof performance.
- Maintain Alignment Accuracy: Panelled walls must remain level and straight to support enclosure installation. Accurate alignment ensures proper door function and structural stability.
What Maintenance And Cleaning Considerations Apply To Shower Panels?
Shower panel maintenance requires 6 actions including regular cleaning, limescale removal, joint inspection, seal maintenance, scratch prevention, and ventilation control to maintain waterproof performance and surface quality across 4–15 mm panels in daily-use environments. Shower panels use non-porous surfaces that reduce dirt absorption and simplify cleaning compared to tiled walls.

The maintenance and cleaning considerations for shower panels are given below:
- Clean Surfaces Regularly: Wipe panels 2–3 times per week using non-abrasive cleaners to remove soap residue and water marks. Regular cleaning maintains surface clarity and hygiene.
- Remove Limescale Deposits: Clean limescale buildup weekly in hard water areas using suitable descaling solutions. Limescale removal prevents surface staining and dullness.
- Inspect Panel Joints: Check joints and seams every 3–6 months for gaps or wear. Early inspection prevents water ingress behind panels.
- Maintain Sealant Condition: Replace silicone sealant every 2–3 years or when cracks appear. Seal maintenance ensures continuous waterproof protection.
- Avoid Abrasive Tools: Use soft cloths instead of abrasive pads to prevent scratching panel surfaces. Gentle cleaning preserves finish quality.
- Control Bathroom Ventilation: Improve airflow using extractors or windows to reduce moisture buildup. Proper ventilation limits mould formation on panel surfaces.
- Dry Panels After Use: Remove excess water using a squeegee after each shower. Drying reduces water spots and limescale accumulation.
What Durability Ratings Apply To Shower Wall Panelling?
Shower wall panelling durability is defined by 5 key ratings including impact resistance, water resistance, surface wear cycles, thickness strength, and lifespan expectancy, with panels lasting 10–20 years and operating across 4–15 mm thickness under continuous moisture exposure. Durability ratings determine how shower wall panels perform under daily use, water exposure, and cleaning cycles. Material composition such as PVC, laminate, or composite cores influences resistance to impact, heat, and moisture.
The durability ratings for shower wall panelling are given below:
- Measure Impact Resistance: Shower panels resist impact based on material density, with composite panels offering higher resistance compared to PVC panels. Impact resistance prevents cracks and structural damage.
- Ensure Water Resistance: Shower panels provide 100% waterproof surfaces when sealed correctly, preventing moisture penetration behind panels. Water resistance maintains wall integrity.
- Evaluate Wear Cycles: Surface layers withstand repeated cleaning cycles exceeding 10,000–50,000 wipes without significant degradation. Wear resistance maintains visual quality.
- Assess Panel Thickness Strength: Panel thickness ranges between 4–15 mm, with thicker panels offering higher rigidity and reduced flex under pressure. Thickness improves structural stability.
- Determine Lifespan Expectancy: Shower panels maintain performance for 10–20 years depending on material quality and maintenance frequency. Lifespan reflects durability under regular use.
- Check Heat Resistance: Shower panels tolerate temperature ranges up to 60–80°C without deformation. Heat resistance supports use in hot water environments.
- Monitor Surface Scratch Resistance: Protective coatings reduce visible scratches during cleaning and daily use. Scratch resistance maintains surface finish over time.
How Do Installation Costs Vary By Panelling Type?
Installation costs vary by panelling type across 4 categories including PVC panels (£40–£90/m²), acrylic panels (£60–£140/m²), laminate panels (£80–£180/m²), and composite panels (£100–£250/m²), influenced by material weight, cutting complexity, and installation time. Cost variation depends on panel material, thickness, surface finish, and labour requirements.
The installation cost variation by panelling type is given below:
- Use PVC Panels: PVC panels cost £40–£90/m² including installation. Lightweight structure reduces labour time and simplifies cutting and fixing. PVC panels provide cost-efficient solutions for standard bathrooms.
- Use Acrylic Panels: Acrylic panels cost £60–£140/m² installed. Smooth surfaces and higher material density increase cutting precision requirements. Acrylic panels offer higher visual finish quality.
- Use Laminate Panels: Laminate panels cost £80–£180/m² installed. High-pressure laminate requires careful cutting and edge sealing, increasing labour complexity. Laminate panels provide strong durability.
- Use Composite Panels: Composite panels cost £100–£250/m² installed. Dense multi-layer construction increases cutting difficulty and installation time. Composite panels offer high strength and long lifespan.
- Consider Wall Preparation Cost: Additional costs increase by 10–30% when wall levelling, tile removal, or waterproofing systems are required before installation. Preparation complexity impacts total cost.
- Account For Layout Complexity: Costs increase in bathrooms with multiple fixtures, corners, or windows due to additional cutting and sealing work. Complex layouts require more labour time.
- Compare DIY Vs Professional: DIY installation reduces labour cost by 60–70%, but requires accurate tools, measurement, and sealing for proper results. Professional installation ensures precision and durability.
Are Shower Panels A Good Investment For Bathrooms?
Shower panels are a good investment for bathrooms because they provide waterproof protection, reduce maintenance requirements, and enable installation within 1–2 days while maintaining durability for 10–20 years across 4–15 mm panel systems. Shower panels replace tiled walls with seamless, grout-free surfaces that resist moisture and simplify cleaning. Material composition such as PVC, laminate, or composite cores ensures structural stability under continuous water exposure.

Waterproof Performance
Shower panels create non-porous surfaces that prevent water penetration behind walls. Continuous coverage reduces risk of damp damage and mould growth. Waterproof performance supports long-term reliability in wet environments.
Low Maintenance
Shower panels eliminate grout lines, reducing cleaning frequency and preventing dirt accumulation. Smooth surfaces require simple wiping for maintenance. Reduced upkeep lowers long-term maintenance effort.
Fast Installation
Shower panels install within 1–2 days using large formats between 2400–2700 mm height. Adhesive fixing reduces installation complexity. Faster installation lowers labour time and disruption.
Cost Efficiency
Shower panels reduce labour costs by up to 60–70% compared to tiled installations. Lower maintenance requirements reduce ongoing expenses. Cost efficiency improves overall investment value.
Long-Term Durability
Shower panels maintain performance for 10–20 years depending on material quality and maintenance. Rigid cores resist impact and moisture exposure. Durability ensures extended product lifespan.
What Design Mistakes Should You Avoid With Shower Panelling?
Shower panelling design mistakes include 7 critical errors such as excessive pattern use, poor colour contrast, incorrect panel sizing, misaligned layouts, overuse of dark tones, inconsistent finishes, and ignoring lighting impact, leading to reduced visual balance and spatial distortion.
The design mistakes to avoid with shower panelling are given below:
- Avoid Excessive Patterns: Using multiple bold patterns creates visual clutter and reduces design clarity. Controlled pattern use maintains balance and focus.
- Avoid Poor Colour Contrast: Incorrect colour combinations reduce visual harmony and depth. Balanced contrast improves spatial definition and aesthetic consistency.
- Avoid Incorrect Panel Sizing: Small panels increase joint lines and disrupt surface continuity. Large panels between 2400–2700 mm improve seamless appearance.
- Avoid Misaligned Layouts: Uneven panel alignment creates visible gaps and inconsistent design flow. Accurate positioning ensures clean visual lines.
- Avoid Overuse Of Dark Tones: Excessive dark panels reduce brightness and make spaces appear smaller. Balanced use of light tones improves spatial perception.
- Avoid Inconsistent Finishes: Mixing unrelated textures or finishes creates design inconsistency. Controlled finish selection maintains a cohesive appearance.
- Avoid Ignoring Lighting Impact: Poor lighting reduces panel visibility and finish quality. Proper lighting enhances texture, colour, and overall design effect.
Summing Up
Shower wall panelling delivers waterproof protection, design flexibility, and low-maintenance performance through material selection, layout planning, and correct installation across 4–15 mm panels with lifespan ranges of 10–20 years.
Shower wall panelling uses PVC, acrylic, laminate, or composite materials to create seamless, grout-free surfaces that resist moisture and simplify cleaning. Panel type selection influences durability, finish quality, and installation cost, while design strategies vary based on bathroom size, using light tones and minimal layouts for compact spaces and feature walls with contrast for large ensuites. Colour schemes, floor combinations, and enclosure types such as sliding, walk-in, and hinged systems define overall bathroom structure and usability.
Installation quality, sealing accuracy, and alignment determine long-term waterproof performance. Design mistakes such as excessive patterns, poor contrast, and misalignment reduce visual balance and lifespan. Proper selection and execution ensure consistent performance, durable structure, and a cohesive shower environment.