Shower screen installation is the process of fitting toughened safety glass panels to control water spray, manage moisture, improve safety, and protect bathroom surfaces during shower use. Correct installation depends on accurate measurement, appropriate screen type, compliant glass specification, secure fixing, precise sealing, and alignment with drainage behaviour.
Shower screen performance varies by design, including fixed, hinged, sliding, folding, walk-in, curved, and bath-mounted screens, each requiring specific sizes, glass thickness, fixing methods, and clearance planning. Glass type, wall condition, floor level, and opening mechanism directly affect water containment efficiency and long-term durability.
Effective installation reduces common issues such as leaks, surface damage, and glass stress while extending service life through correct maintenance and cleaning practices. Modern shower screen use prioritises clarity, minimal hardware, hygiene control, and functional water management rather than decorative emphasis.
What Is a Shower Screen?
A shower screen is a toughened glass panel installed around a shower area to contain water spray, control moisture spread, and protect bathroom floors and walls from wetting during shower use. Shower screens use safety glass between 6 mm and 10 mm thick for strength and durability.
Toughened safety glass is produced through thermal tempering that increases impact resistance by approximately 400% compared with annealed glass, according to British Glass material performance data. Breakage behaviour results in small blunt granules rather than sharp fragments, which improves safety in wet bathroom environments.
Water containment created by a shower screen reduces floor saturation, limits moisture movement across tiles and joints, and supports long-term surface durability. Shower screens operate as functional water-control components that combine glass strength, splash management, and spatial separation within a shower area.
What Are the Benefits of Installing a Shower Screen?

The benefits of installing a shower screen are water containment, moisture control, safety improvement, hygiene support, space efficiency, and surface durability preservation. Installing a shower screen defines the showering zone, controls splash dispersion, and stabilises water behaviour during repeated shower use.
Water Containment
Water containment is achieved by restricting shower spray to a defined enclosure area. Glass panels limit splash radius, prevent uncontrolled runoff, and reduce standing water formation on surrounding floors and walls.
Moisture Control
Moisture control results from separating wet and dry bathroom zones. Reduced water migration lowers saturation across tiles, grout lines, sealants, and substrates exposed to repeated showering.
Safety Improvement
Safety improvement occurs through reduced floor wetness outside the shower area. Lower surface saturation improves slip resistance and decreases fall risk in wet-use bathroom environments.
Hygiene Support
Hygiene support is provided by limiting water pooling and persistent damp surfaces. Reduced moisture accumulation slows residue build-up and supports cleaner surface conditions over time.
Space Efficiency
Space efficiency is supported through transparent glass separation instead of solid barriers. Visual openness maintains spatial continuity while preserving functional separation within compact bathroom layouts.
Surface Durability Preservation
Surface durability preservation results from minimised water contact with non-shower surfaces. Lower exposure slows material wear across tiles, joints, fixtures, and adjacent finishes during long-term use.
What Types of Shower Screens Can Be Installed?

The types of shower screens that can be installed are fixed shower screens, hinged shower screens, pivot shower screens, sliding shower screens, folding shower screens, curved shower screens, corner shower screens, walk-in shower screens, and bath shower screens. Each shower screen type aligns with a specific enclosure layout, access method, and water containment requirement.
Fixed Shower Screens
Fixed shower screens are stationary glass panels installed to form a permanent splash barrier. Fixed shower screens suit walk-in shower layouts, provide consistent water containment, and rely on panel positioning rather than movement.
Hinged Shower Screens
Hinged shower screens are glass panels attached using side-mounted hinges for inward or outward opening. Hinged shower screens support wide access openings and maintain effective water containment when closed.
Pivot Shower Screens
Pivot shower screens rotate on a central pivot point positioned at the top and bottom of the glass panel. Pivot shower screens distribute weight evenly and suit larger openings requiring smooth rotational movement.
Sliding Shower Screens
Sliding shower screens use horizontally moving glass panels guided by track systems. Sliding shower screens optimise access where outward clearance is limited and maintain water containment through overlapping panels.
Folding Shower Screens
Folding shower screens consist of multiple hinged glass sections that fold inward. Folding shower screens reduce projection space and support compact bathroom layouts without sacrificing splash control.
Curved Shower Screens
Curved shower screens are shaped glass panels designed for quadrant or offset quadrant enclosures. Curved shower screens follow rounded tray profiles and provide uniform water containment along curved edges.
Corner Shower Screens
Corner shower screens enclose shower areas positioned at bathroom corners using two glass panels. Corner shower screens maximise space efficiency and create a defined showering zone within limited floor areas.
Walk-In Shower Screens
Walk-in shower screens use one or more fixed panels with an open entry point. Walk-in shower screens support barrier-free access and rely on strategic panel placement for splash management.
Bath Shower Screens
Bath shower screens are glass panels installed along the edge of a bath for combined bathing and showering use. Bath shower screens prevent water overflow and protect surrounding bathroom surfaces during shower operation.
What Shower Screen Sizes and Measurements Do You Need Before Installation?
Shower screen sizes and measurements required before installation are screen height, screen width, glass thickness, opening clearance, and wall alignment tolerance. Accurate measurement ensures effective water containment, correct glass fit, safe operation, and long-term performance of the shower screen installation.
Shower Screen Height
Shower screen height defines vertical water containment and splash control efficiency. Standard shower screen heights range from 1400 mm to 2000 mm, with taller screens reducing overspray in high-pressure or overhead shower configurations.
Shower Screen Width
Shower screen width determines horizontal coverage and enclosure effectiveness. Common widths range from 700 mm to 1200 mm, measured at the widest usable opening to ensure full splash protection without restricting access.
Glass Thickness
Glass thickness determines structural strength and installation stability. Shower screens typically use 6 mm, 8 mm, or 10 mm toughened safety glass, with thicker glass providing greater rigidity and reduced flex during use.
Opening and Clearance Space
Opening and clearance space control access and movement during shower use. Hinged and pivot screens require sufficient swing clearance, while sliding and fixed screens rely on overlap and entry gap measurements.
Wall and Floor Alignment
Wall and floor alignment measurements identify out-of-plumb or uneven surfaces. Accurate tolerance checks prevent installation stress, ensure proper sealing, and maintain consistent water containment across the shower screen edges.
What Glass Types Are Used in Shower Screens?

The glass types used in shower screens are toughened safety glass, laminated safety glass, low-iron glass, frosted glass, patterned glass, tinted glass, and coated glass. Each glass type supports shower screen installation by addressing safety performance, visual clarity, privacy control, and surface maintenance requirements.
Toughened Safety Glass
Toughened safety glass is heat-treated glass designed to resist impact and thermal stress. Toughened safety glass breaks into small blunt granules under failure conditions and represents the most common glass type used in shower screens.
Laminated Safety Glass
Laminated safety glass consists of two bonded glass layers with an interlayer. Laminated safety glass retains fragments on breakage and provides enhanced safety control in high-impact or regulated environments.
Low-Iron Glass
Low-iron glass is reduced-iron glass that delivers higher optical clarity. Low-iron glass removes green tinting found in standard glass and provides clearer visual definition of tiles and finishes behind the shower screen.
Frosted Glass
Frosted glass is acid-etched or sandblasted glass designed for privacy control. Frosted glass obscures visibility while maintaining light transmission across the shower enclosure.
Patterned Glass
Patterned glass features textured surface designs formed during glass manufacture. Patterned glass provides visual privacy while maintaining water containment performance within shower screen installations.
Tinted Glass
Tinted glass is coloured glass designed to reduce glare and visual contrast. Tinted glass options include grey, bronze, and smoked finishes that alter light transmission levels.
Coated Glass
Coated glass includes surface treatments that reduce water spotting and limescale adhesion. Hydrophobic coatings improve cleaning efficiency and maintain surface clarity under repeated water exposure.
What Tools and Materials Are Needed for Shower Screen Installation?
The tools and materials needed for shower screen installation are measuring tools, marking tools, drilling tools, fixing hardware, alignment aids, sealing materials, surface preparation items, handling equipment, and safety protection. Complete preparation ensures accurate fitting, water containment performance, and installation safety.
Measuring and Marking Tools
Measuring and marking tools establish dimensional accuracy and fixing reference points. Accurate measurement prevents misalignment and sealing failure.
The measuring and marking tools required are given below:
- Tape measure for height, width, and entry gap measurement
- Spirit level for vertical and horizontal alignment
- Laser level for long panel alignment accuracy
- Pencil or non-permanent marker for fixing point marking
Drilling and Fixing Tools
Drilling and fixing tools create secure anchor points for brackets and channels. Correct drilling protects tile surfaces and substrate integrity.
The drilling and fixing tools required are given below:
- Variable-speed electric drill
- Tile drill bits for ceramic, porcelain, and stone
- Masonry drill bits for solid wall substrates
- Screwdrivers or driver bit sets
Fixing Hardware and Mounting Components
Fixing hardware and mounting components secure the shower screen structure. Hardware selection depends on screen type and wall construction.
The fixing hardware and mounting components required are given below:
- Wall channels or wall-mounted brackets
- Screws matched to wall substrate
- Wall plugs appropriate for solid or hollow walls
- Hinges, pivots, rollers, or runners based on screen design
Alignment and Support Equipment
Alignment and support equipment stabilises glass panels during positioning. Proper support reduces stress on glass edges.
The alignment and support equipment required are given below:
- Temporary support blocks or wedges
- Glass suction lifters for panel handling
- Allen keys for hinge and bracket adjustment
Sealing and Waterproofing Materials
Sealing and waterproofing materials prevent water leakage at contact points. Controlled sealing maintains long-term containment.
The sealing and waterproofing materials required are given below:
- Sanitary-grade silicone sealant
- Sealant gun for even application
- Masking tape for controlled sealant edges
- Cleaning wipes for surface preparation
Surface Preparation Materials
Surface preparation materials ensure clean bonding and accurate fixing. Clean surfaces improve sealant adhesion.
The surface preparation materials required are given below:
- Isopropyl alcohol or degreasing cleaner
- Lint-free cloths
- Dust removal brush or vacuum
Handling and Protection Equipment
Handling and protection equipment supports safe glass movement and placement. Controlled handling reduces breakage risk.
The handling and protection equipment required are given below:
- Glass carrying gloves with cut resistance
- Protective footwear
- Eye protection for drilling and fixing operations
Can You Install a Shower Screen Yourself or Should You Hire a Professional?

A shower screen can be installed by a homeowner for simple fixed or bath screen setups, while professional installation is required for hinged, sliding, pivot, curved, or large-format glass shower screens. Installation choice depends on glass weight, alignment tolerance, wall condition, and sealing accuracy.
When Shower Screen Installation Is Suitable for DIY
DIY shower screen installation is suitable for lightweight fixed panels and standard bath shower screens. Straight walls, level floors, pre-drilled fixing points, and single-panel designs reduce alignment complexity and sealing risk during installation.
When Professional Shower Screen Installation Is Required
Professional installation is required for complex shower screen systems involving heavy glass panels, moving parts, or precise tolerances. Hinged, sliding, pivot, curved, and walk-in shower screens require accurate levelling, controlled drilling, and stress-free glass mounting to prevent breakage and water leakage.
Risks of Incorrect Shower Screen Installation
Incorrect shower screen installation causes water leakage, glass stress fractures, and fixing failure. Poor alignment, uneven sealing, and incorrect drilling compromise water containment performance and reduce glass lifespan.
Advantages of Professional Shower Screen Installation
Professional shower screen installation ensures correct alignment, secure fixing, and consistent water sealing. Accurate installation maintains glass integrity, improves long-term durability, and preserves intended shower screen performance without installation-related defects.
How Do You Prepare the Area Before Installing a Shower Screen?
Preparing the area before installing a shower screen requires surface inspection, accurate measurement, wall and floor alignment checks, cleaning, and verification of waterproof integrity. Proper preparation ensures correct glass positioning, secure fixing, and effective water containment during shower screen installation.
Inspect Walls and Floors
Wall and floor inspection confirms structural suitability for shower screen installation. Surfaces must be solid, crack-free, and capable of supporting glass weight without movement. Uneven tiles, loose substrates, and hollow sections require correction before fixing points are marked.
Measure the Installation Area
Accurate measurement defines shower screen height, width, and fixing alignment. Measurements must be taken at multiple points to account for wall taper and floor variation, ensuring glass panels fit within tolerance limits and maintain sealing consistency.
Check Wall and Floor Alignment
Alignment checks identify out-of-plumb walls and uneven floors. Spirit level or laser level verification prevents glass stress, hinge misalignment, and sealing gaps along vertical and horizontal edges.
Clean All Contact Surfaces
Surface cleaning removes dust, grease, and residue from walls and floors. Clean contact points improve bracket stability and silicone adhesion, supporting long-term water containment.
Verify Waterproofing and Sealing Areas
Waterproof integrity verification confirms that shower trays, baths, and wall joints are fully sealed. Existing sealant must be intact and cured before shower screen installation to prevent hidden leakage behind glass panels.
Mark Fixing Points
Fixing point marking establishes precise drill locations for brackets and channels. Markings must align with measurements and levels to ensure accurate glass positioning and secure mounting.
How Do You Install a Shower Screen Step by Step?

Shower screen installation follows a twelve-step process covering component verification, measurement confirmation, fixing preparation, glass positioning, sealing, curing, and final inspection to achieve correct alignment, safe fixing, and effective water containment. Each step controls glass stress, splash management, and long-term installation stability.
Step 1: Verify All Components
Component verification confirms glass panels, brackets, fixings, seals, and fittings are complete and undamaged. Missing or incorrect components create alignment failure and fixing instability.
Step 2: Confirm Final Measurements
Final measurement confirmation validates height, width, and opening clearance at multiple points. Multi-point measurement accounts for wall deviation and floor variation.
Step 3: Mark Reference Lines
Reference line marking establishes vertical and horizontal alignment guides. Accurate lines prevent panel twist and uneven load distribution.
Step 4: Protect Surrounding Surfaces
Surface protection prevents tile, tray, and fitting damage during drilling and handling. Masking tape and covers reduce impact and abrasion risk.
Step 5: Drill Fixing Holes
Fixing hole drilling creates secure anchor points for brackets or channels. Low-speed drilling with correct tile bits prevents cracking and substrate damage.
Step 6: Install Wall Channels or Brackets
Wall channel or bracket installation forms the structural support framework. Vertical alignment checks prevent glass stress and sealing gaps.
Step 7: Position the Glass Panel
Glass panel positioning places the screen into the support structure. Temporary supports maintain stability during alignment checks.
Step 8: Secure and Adjust Hardware
Hardware securing locks the glass into its final position. Even tightening prevents pressure points and movement restriction.
Step 9: Fit Seals and Water Deflectors
Seal and deflector fitting directs water back into the shower area. Correct placement improves splash control at open edges.
Step 10: Apply Silicone Sealant
Silicone sealant application creates watertight joints at glass-to-wall and glass-to-floor interfaces. Sanitary-grade sealant ensures long-term moisture resistance.
Step 11: Allow Sealant to Cure
Sealant curing ensures full waterproof integrity. Shower use before cure completion compromises sealing performance.
Step 12: Perform Final Inspection
Final inspection confirms alignment accuracy, fixing security, and smooth operation. Visual checks and movement tests verify effective water containment.
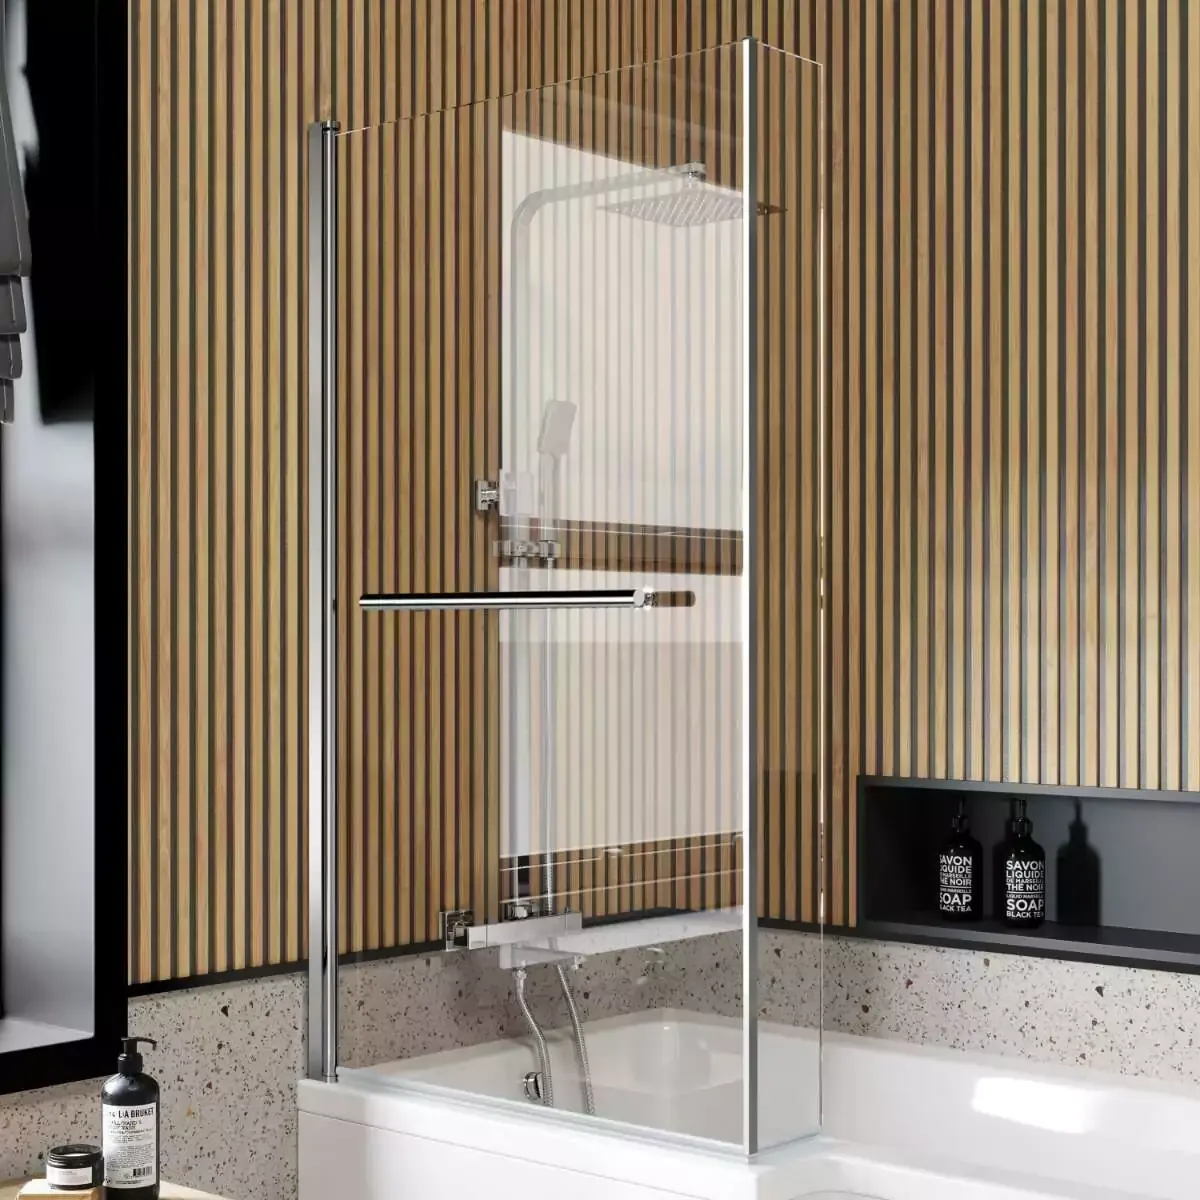
How Do You Install a Shower Screen on a Bath?
Installing a shower screen on a bath follows a nine-step process covering bath verification, measurement, wall fixing, glass positioning, sealing, curing, and inspection to achieve accurate alignment and effective water containment. Bath shower screen installation focuses on secure wall fixing, stable bath-edge seating, and controlled splash management.
Step 1: Verify Bath and Wall Stability
Bath and wall stability verification confirms rigid fixing and level support surfaces. Bath rims require firm anchoring without flex, while wall substrates require sufficient load capacity for brackets or channels.
Step 2: Confirm Measurements
Measurement confirmation establishes screen height, bath-edge alignment, and fixing positions. Multi-point checks along the bath rim and wall account for curvature, taper, and level variation.
Step 3: Mark Vertical Fixing Lines
Vertical fixing line marking defines precise alignment for wall brackets or channels. Straight reference lines prevent screen tilt and uneven sealing along the bath edge.
Step 4: Protect Adjacent Surfaces
Surface protection prevents damage to tiles, bath enamel, and fittings during drilling and handling. Masking tape and covers reduce abrasion and impact risk.
Step 5: Drill Wall Fixing Holes
Wall fixing hole drilling creates secure anchor points for mounting hardware. Low-speed drilling with tile-specific bits prevents cracking and substrate damage.
Step 6: Install Wall Brackets or Channels
Wall bracket or channel installation forms the primary structural support. Vertical alignment checks ensure even load distribution before glass placement.
Step 7: Position the Shower Screen on the Bath
Shower screen positioning seats the glass panel onto the bath rim using seals or gaskets. Correct seating prevents direct glass-to-bath contact and maintains edge stability.
Step 8: Secure Glass and Adjust Hardware
Glass securing and hardware adjustment lock the screen into final position. Even tightening prevents pressure points and supports smooth hinge or pivot movement.
Step 9: Apply Silicone Sealant and Cure
Silicone sealant application creates a watertight joint along the internal bath edge and wall interface. Full curing completion is required before shower use to preserve sealing integrity.
How Do You Install a Shower Screen in a Walk-In Shower or Wet Room?

Installing a shower screen in a walk-in shower or wet room requires controlled glass positioning, secure wall fixing, alignment with floor drainage, and selective sealing to manage splash without enclosing the shower area. Installation success depends on substrate strength, accurate offsets, and preservation of water flow paths.
Substrate and Waterproofing Verification
Substrate and waterproofing verification confirms load-bearing walls and continuous tanking behind tiled surfaces. Solid masonry or reinforced stud walls support brackets or channels, while intact membranes prevent concealed moisture ingress at fixing points.
Drainage and Floor Gradient Confirmation
Drainage and floor gradient confirmation ensures water migrates toward the drain rather than beyond the screen line. Correct falls limit splash-back and pooling in open-entry configurations.
Screen Position and Offset Definition
Screen position and offset definition establishes glass distance from the shower outlet and entry gap width. Correct offsets control spray trajectory while maintaining open access.
Measurement and Reference Alignment
Measurement and reference alignment establish screen height, width, and plumb guides at multiple points. Multi-point checks account for wall deviation and floor variation common in wet rooms.
Fixing Preparation and Installation
Fixing preparation and installation create stable anchor points for wall channels or brackets. Low-speed drilling with tile-specific bits protects finishes and preserves substrate integrity.
Glass Placement and Securing
Glass placement and securing seat the panel into the support framework with even load distribution. Temporary supports stabilise the panel during final alignment and fastening.
Deflector and Selective Sealing
Deflector and selective sealing guide water back toward the drain while preserving floor drainage. Wall interfaces receive sealant, while floor edges remain unsealed where drainage design requires.
Curing and Final Inspection
Curing and final inspection complete the installation by confirming alignment, fixing security, and splash control. Sealant cure completion finalises watertight performance without restricting water flow.
What Are the Most Common Shower Screen Installation Mistakes?
The most common shower screen installation mistakes are incorrect measurement, poor wall alignment, improper drilling, uneven glass loading, inadequate sealing, incorrect screen positioning, and ignoring drainage behaviour. These errors reduce water containment performance, compromise safety, and shorten the service life of a shower screen.
Incorrect Measurements
Incorrect measurements cause misalignment, sealing gaps, and fitting stress. Single-point measuring ignores wall taper and floor variation, which leads to poor glass fit and inconsistent edge contact.
Poor Wall or Floor Alignment
Poor wall or floor alignment creates uneven load distribution on the glass panel. Out-of-plumb walls and uneven floors introduce stress points that increase the risk of glass movement and seal failure.
Improper Drilling Technique
Improper drilling damages tiles and weakens fixing points. High-speed drilling, incorrect drill bits, or drilling without surface protection causes tile cracking and unstable bracket anchoring.
Uneven Glass Loading
Uneven glass loading occurs when fixings are tightened inconsistently. Localised pressure points increase the risk of glass stress fractures and restrict smooth hinge or slider operation.
Inadequate Sealing
Inadequate sealing allows water leakage at glass-to-wall and glass-to-floor interfaces. Incomplete sealant lines, poor surface preparation, or premature water exposure compromise watertight performance.
Incorrect Screen Positioning
Incorrect screen positioning reduces splash containment effectiveness. Poor offset from the shower outlet or entry gap misplacement allows water to escape beyond the intended wet zone.
Ignoring Drainage Behaviour
Ignoring drainage behaviour causes water pooling outside the shower area. Failure to align the screen with floor gradients and drain location reduces wet room and walk-in shower performance.
How Do You Fix or Prevent Shower Screen Leaks After Installation?
Shower screen leaks are fixed or prevented by correcting sealant failure, improving glass alignment, installing deflectors, adjusting screen position, and ensuring drainage compatibility with splash paths. Effective leak control depends on targeted inspection, precise sealing, and alignment with water flow behaviour after installation.
Identify the Leak Source
Leak source identification isolates whether water escapes at wall joints, floor edges, hinges, or open entry gaps. Visual inspection during controlled water flow reveals failure points without dismantling the shower screen.
Replace or Repair Silicone Sealant
Sealant repair restores watertight joints at glass-to-wall and glass-to-floor interfaces. Old or incomplete silicone must be fully removed, surfaces cleaned, and sanitary-grade sealant reapplied in a continuous internal bead.
Improve Glass Alignment
Glass alignment correction removes gaps caused by out-of-plumb walls or uneven floors. Re-levelling brackets or channels restores even edge contact and prevents water tracking behind the screen.
Install Water Deflectors or Seals
Deflector and seal installation redirects water back into the shower area. Vertical edge seals and bottom deflectors reduce splash escape at open edges without enclosing the shower.
Adjust Screen Position or Offset
Screen position adjustment improves splash containment relative to the shower outlet. Repositioning the panel reduces direct spray impact toward entry gaps in walk-in or wet room layouts.
Check Drainage and Floor Falls
Drainage and floor fall verification ensures water migrates toward the drain. Poor gradients cause pooling that overwhelms seals even when installation quality is correct.
Allow Proper Sealant Curing
Sealant curing completion ensures full waterproof performance. Water exposure before cure completion compromises adhesion and creates early leak paths.
How Long Does Shower Screen Installation Take?
Shower screen installation takes between 60 and 180 minutes depending on screen type, glass size, wall condition, and sealing requirements. Simple fixed or bath shower screens require less time, while hinged, sliding, curved, or walk-in shower screens require extended alignment, fixing, and curing stages.
Installation Time for Simple Shower Screens
Simple shower screen installation takes 60–90 minutes when walls are level and fixing points are pre-marked. Fixed panels and standard bath shower screens involve fewer components, minimal alignment adjustment, and straightforward sealing.
Installation Time for Complex Shower Screens
Complex shower screen installation takes 120–180 minutes due to additional components and precision requirements. Hinged, sliding, pivot, curved, and walk-in shower screens require accurate levelling, hardware adjustment, deflector fitting, and controlled sealing.
Sealant Curing Time After Installation
Sealant curing time extends installation completion by 12–24 hours before shower use. Silicone curing ensures full waterproof integrity and prevents early leakage caused by premature water exposure.
Factors That Extend Installation Time
Installation time increases with uneven walls, tiled surface hardness, large-format glass, and multi-panel systems. Alignment correction, careful drilling, and additional sealing stages lengthen the overall process.
What UK Regulations and Safety Standards Apply to Shower Screen Installation?
Shower screen installation is governed by safety glazing standards, building safety requirements, and electrical zoning rules that control glass strength, impact resistance, fixing location, and moisture protection. Compliance ensures user safety, structural stability, and lawful bathroom installation practice.
Safety Glass Standards (BS EN 12150 and BS EN 14428)
Safety glass compliance requires shower screens to use toughened or laminated glass manufactured to BS EN 12150 or BS EN 14428 standards. These standards define impact resistance, fragmentation behaviour, thickness tolerance, and performance testing for shower enclosures and screens.
Building Regulations – Part K (Protection From Falling, Collision, and Impact)
Building Regulations Part K applies to shower screen glass positioned in areas subject to human impact. Part K requires safety glazing in critical locations, including bathrooms, to reduce injury risk from collision or breakage.
Building Regulations – Part M (Access and Use of Buildings)
Building Regulations Part M influences shower screen positioning in accessible bathroom layouts. Part M considerations affect entry width, obstruction avoidance, and safe movement within shower areas where applicable.
Electrical Safety – Part P and Bathroom Zones
Electrical safety compliance under Part P restricts fixing proximity to electrical zones. Shower screen installation must not compromise electrical safety zones surrounding showers, controls, and fittings in wet areas.
Manufacturer Installation Specifications
Manufacturer installation instructions form a mandatory compliance requirement. Deviating from specified fixing methods, glass orientation, or sealing guidance invalidates safety certification and product performance claims.
Workplace Safety and Manual Handling Guidance
Manual handling and safety guidance apply during installation involving large glass panels. Safe handling procedures reduce injury risk when lifting, positioning, and securing shower screen glass.
How Do You Maintain and Clean a Shower Screen After Installation?
Maintaining and cleaning a shower screen after installation requires regular surface drying, non-abrasive cleaning, seal inspection, and coating preservation to prevent limescale build-up, staining, and seal degradation. Consistent maintenance preserves glass clarity, water containment performance, and long-term surface durability.
Daily Surface Care
Daily surface care reduces water residue and mineral deposits on the glass. Using a squeegee or soft cloth after shower use removes excess water and limits limescale formation on the shower screen surface.
Routine Cleaning
Routine cleaning removes soap residue, oils, and light mineral deposits. Mild, non-abrasive cleaners applied weekly prevent surface dulling and protect glass coatings and seals from chemical damage.
Limescale Removal
Limescale removal restores glass clarity in hard-water environments. Diluted vinegar or citric-acid-based cleaners dissolve calcium deposits without scratching the glass when applied with soft cloths.
Seal and Fixing Inspection
Seal and fixing inspection identifies early signs of wear or leakage. Regular checks of silicone joints, brackets, and hinges prevent water escape and maintain structural stability.
Coating Preservation
Coating preservation maintains hydrophobic performance on treated glass. Avoiding abrasive pads and harsh chemicals protects water-repellent coatings that reduce spotting and cleaning frequency.
Periodic Deep Cleaning
Periodic deep cleaning removes accumulated residue from edges, seals, and fittings. Targeted cleaning of corners and deflectors prevents hidden moisture retention and hygiene issues.
How Long Should a Shower Screen Last?
A shower screen lasts between 10 and 20 years when manufactured from toughened safety glass and maintained with correct cleaning, sealing, and hardware care. Lifespan depends on glass thickness, installation accuracy, seal condition, and frequency of use rather than age alone.
Glass Lifespan
Toughened safety glass maintains structural integrity for decades under normal bathroom conditions. Glass failure rarely occurs from age and more commonly results from edge damage, point loading, or incorrect installation stress.
Sealant Lifespan
Silicone sealant lasts between 5 and 10 years before replacement becomes necessary. Seal degradation occurs through repeated moisture exposure, cleaning chemicals, and thermal movement at joints.
Hardware and Fixings Lifespan
Brackets, hinges, and fixings typically last 8 to 15 years depending on material quality and maintenance. Corrosion, mineral build-up, and mechanical wear reduce hardware performance over time.
Factors That Shorten Shower Screen Lifespan
Premature failure occurs through poor installation, aggressive cleaning agents, neglected seal inspection, and persistent water leakage. Correct alignment, gentle cleaning, and periodic resealing extend operational lifespan.
How Much Does a Shower Screen Cost in the United Kingdom?
A shower screen costs between £100 and £2,000 depending on glass type, screen size, design complexity, and installation method. Basic fixed or bath shower screens sit at the lower price range, while frameless, walk-in, curved, and bespoke shower screens occupy higher price bands.
Cost of Standard Shower Screens
Standard shower screens cost between £100 and £500 for supply only. Fixed panels, bath shower screens, and simple hinged designs with 6–8 mm toughened glass represent the most affordable options.
Cost of Walk-In and Frameless Shower Screens
Walk-in and frameless shower screens cost between £500 and £1,500. Thicker 8–10 mm glass, larger panel sizes, minimal hardware, and specialist fittings increase material and handling costs.
Cost of Bespoke and Multi-Panel Shower Screens
Bespoke and multi-panel shower screens cost between £1,200 and £2,000 or more. Custom sizing, curved glass, multiple panels, and premium finishes significantly increase manufacturing and fitting complexity.
Shower Screen Installation Costs
Professional shower screen installation costs between £150 and £700. Installation price depends on screen type, glass weight, wall condition, alignment correction, and sealing requirements.
Factors That Influence Shower Screen Cost
Shower screen cost is influenced by glass thickness, panel dimensions, hardware quality, screen configuration, and installation difficulty. Larger glass panels, premium coatings, and complex layouts increase total project cost.
How Do You Choose the Right Shower Screen for Your Bathroom?

Choosing the right shower screen depends on shower layout, available space, water containment needs, glass type, opening mechanism, and installation constraints. Correct selection aligns shower screen performance with bathroom geometry, splash behaviour, and long-term usability.
Shower Layout and Configuration
Shower layout determines the compatible shower screen type. Walk-in showers require fixed or walk-in panels, alcove showers suit hinged or sliding screens, corner showers align with quadrant or corner screens, and baths require bath shower screens.
Available Space and Access
Available space defines the appropriate opening mechanism. Hinged and pivot screens require outward clearance, sliding screens suit restricted spaces, and folding screens support compact layouts with limited projection.
Water Containment Requirements
Water containment requirements depend on shower head position and spray pattern. Overhead and high-pressure showers require taller and wider screens to reduce splash escape beyond the shower zone.
Glass Thickness and Type
Glass thickness and type determine strength, safety, and appearance. Toughened safety glass between 6 mm and 10 mm balances durability and stability, while low-iron, frosted, or coated glass adjusts clarity, privacy, and maintenance needs.
Installation Surface and Structure
Installation surface condition affects screen compatibility. Solid, plumb walls support heavier frameless or hinged screens, while uneven or lightweight walls favour fixed panels with channels for tolerance adjustment.
Maintenance and Cleaning Preference
Maintenance preference influences glass finish choice. Coated glass reduces water spotting and cleaning frequency, while clear untreated glass requires more regular maintenance.
Budget and Longevity Expectations
Budget and longevity expectations guide material and design selection. Thicker glass, minimal hardware, and simpler designs provide longer service life with fewer moving parts.
What Are the Latest Trends in Shower Screens for Bathrooms?
The latest shower screen trends are frameless construction, minimal hardware finishes, low-iron clear glass, textured privacy glass, hydrophobic coatings, walk-in layouts, and bespoke made-to-measure panels. Current design direction prioritises visual openness, easy maintenance, precise water control, and layout-specific fitting.
Frameless Shower Screens
Frameless shower screens use thick toughened glass with minimal or concealed fixings. Reduced framing increases light transmission, creates uninterrupted sightlines, and supports contemporary bathroom layouts.
Minimal Hardware Finishes
Minimal hardware finishes focus on slim brackets, hidden channels, and muted metal tones. Reduced visual weight improves spatial continuity and lowers visual clutter around the shower area.
Low-Iron Clear Glass
Low-iron glass provides higher optical clarity by reducing natural green tint. Enhanced transparency improves visibility of tiles, stone, and wall finishes behind the shower screen.
Textured and Privacy Glass
Textured and privacy glass introduces surface patterns that obscure visibility while allowing light flow. Fluted, reeded, and frosted finishes balance privacy control with brightness.
Hydrophobic Easy-Clean Coatings
Hydrophobic coatings reduce water adhesion, limescale build-up, and cleaning frequency. Treated glass maintains clarity and surface performance under repeated water exposure.
Walk-In Shower Screen Designs
Walk-in shower screens use fixed panels with open entry points. Barrier-free access, reduced hardware, and controlled splash paths define this design trend.
Bespoke and Made-to-Measure Screens
Bespoke shower screens are cut to fit non-standard layouts, angles, and architectural features. Custom sizing improves water containment accuracy and installation precision.
Conclusion
Shower screen installation succeeds when correct screen type, accurate measurement, compliant glass, precise fixing, and controlled sealing work together to manage water, moisture, and safety within a bathroom. Performance depends on alignment with layout, drainage behaviour, and daily use rather than design alone.
Long-term reliability comes from proper installation, routine cleaning, intact seals, and maintained hardware, which together reduce leaks, surface damage, and premature wear. A well-installed shower screen functions as a durable water-control system that supports hygiene, safety, and surface protection over many years of use.