Installing a vanity unit requires the right tools, correct wall fixings, compatible pipework, and compliance with UK Building Regulations Part P — done correctly, a full installation takes between 2 and 8 hours depending on the unit type and pipework complexity.
A vanity unit combines a washbasin with an enclosed storage cabinet, concealing pipework and organising bathroom essentials within a single fitted structure. The 6 main types — freestanding, wall-hung, floor-standing, corner, cloakroom, and open shelf — each require a different fixing method, wall preparation, and plumbing configuration.
Before starting, identify the wall type, confirm existing pipework positions, check the floor is level, and determine whether the work is notifiable under Part P. Like-for-like replacements on existing pipework are legally completed by a competent DIYer. New installations involving pipework alterations require a Part P registered plumber.
A standard installation requires a drill, spirit level, basin wrench, pipe cutter, adjustable spanner, silicone gun, flexi hoses, PTFE tape, a bottle trap, and sanitary-grade silicone sealant. The installation follows 12 steps: isolating the water supply, removing the old unit, marking and preparing the wall, fixing the cabinet, fitting the tap and waste, connecting the supply pipes, fitting the bottle trap, sealing the unit, and testing every connection for leaks before use.
A like-for-like replacement costs between £150 and £400 including labour. A new installation with pipework alterations costs between £300 and £600. Post-installation maintenance — cleaning weekly, inspecting silicone every 3 months, and replacing flexi hoses every 5 years — extends the lifespan of the vanity unit and prevents water damage behind the cabinet.
What Is a Vanity Unit and Which Type Do You Have?
A vanity unit is a bathroom cabinet that integrates a washbasin with an enclosed storage unit, designed to conceal plumbing pipework and organise bathroom essentials within a single fitted structure.
What Are the Different Types of Vanity Units?
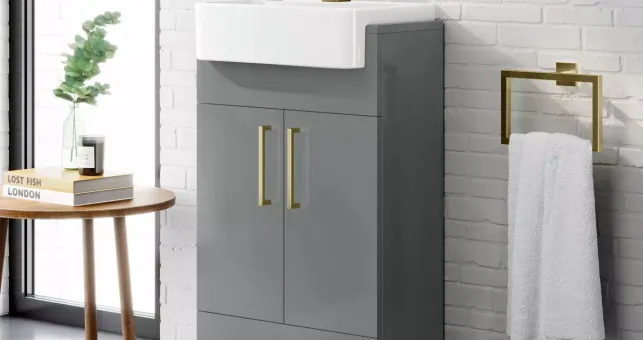
The types of vanity units are freestanding, wall-hung, floor-standing, corner, cloakroom, and open shelf units.
- Freestanding Vanity Units: Stand directly on the bathroom floor without wall fixings, with plumbing connections routed through the base or rear panel.
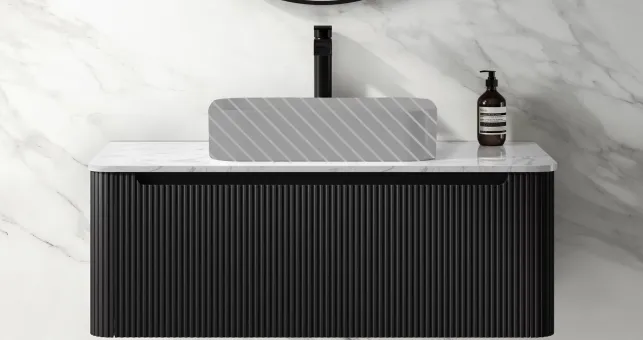
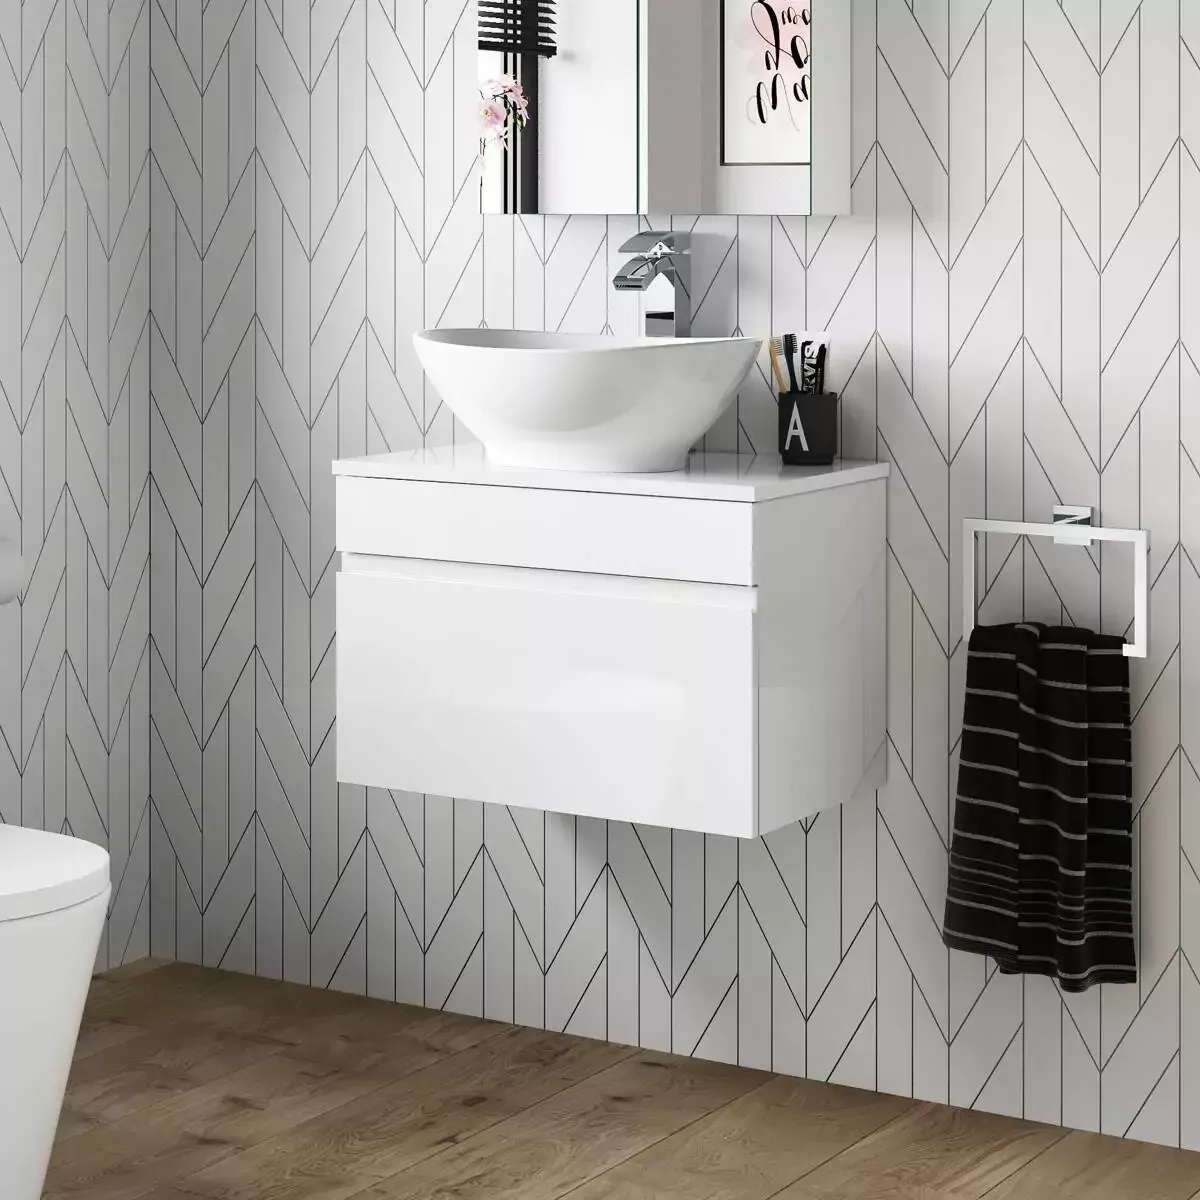
- Wall-Hung / Floating Vanity Units: Mount to the wall via a batten or direct bracket system, suspending the cabinet above the floor to expose the floor surface beneath.
- Floor-Standing Vanity Units: Rest on the floor and fix to the wall at the rear for stability, combining floor contact with wall support for a secure fit.
- Corner Vanity Units: Fix into the junction of two walls, utilising dead corner space, most common in cloakrooms and compact en-suites.
- Cloakroom / Compact Vanity Units: Measure between 350mm and 500mm in width, purpose-built for cloakrooms and bathrooms under 1.5m².
- Open Shelf Vanity Units: Feature an open framework beneath the basin in place of enclosed doors, providing accessible storage without a closed cabinet structure.
What Is the Difference Between a Vanity Unit With a Basin and One Without?
A vanity unit with a basin includes the washbasin as part of the complete unit, whilst a vanity unit without a basin supplies the cabinet only, requiring a separate basin purchase and fitting.
- Vanity Unit With Basin: Supplied as a coordinated set with the basin pre-matched to cabinet dimensions, reducing sizing errors and mismatched aesthetics.
- Vanity Unit Without Basin: Allows independent basin selection, enabling a specific basin style — such as a countertop or undermount basin — to be paired with a chosen cabinet.
Which Vanity Unit Type Is Right for My Bathroom?
The correct vanity unit type is determined by available floor or wall space, existing plumbing outlet position, and preferred storage configuration.
- Bathroom Size: Cloakroom and corner vanity units suit bathrooms under 1.5m². Wall-hung and freestanding units suit standard bathrooms between 3m² and 5m².
- Plumbing Position: Wall-hung vanity units require pipework routed within or directly behind the wall. Freestanding and floor-standing units accommodate exposed pipework routed through the base or rear panel.
- Storage Requirement: Enclosed units provide concealed storage behind cabinet doors. Open shelf units provide accessible storage without door hardware.
What Tools and Materials Do You Need to Install a Vanity Unit?

The tools and materials required to install a vanity unit are a spirit level, drill, screwdriver, adjustable spanner, pipe cutter, basin wrench, hacksaw, jigsaw, hole saw, silicone gun, stud and cable detector, PTFE tape, silicone sealant, isolation valves, flexi hoses, bottle trap, waste pipe, compression fittings, wall plugs, screws, and a timber batten for wall-hung installations.
What Tools Are Needed to Install a Vanity Unit?
The tools needed to install a vanity unit are listed below:
- Spirit Level: Confirms the cabinet sits horizontally before fixing to the wall or floor, preventing misaligned doors and uneven basin pooling.
- Drill and Drill Bits: Creates fixing holes in the wall for wall-hung units and pilot holes for floor-standing units. Masonry bits suit brick or blockwork walls; wood bits suit timber stud walls; tile bits suit tiled surfaces.
- Stud and Cable Detector: Locates timber studs, electrical cables, and concealed pipework behind the wall before drilling, preventing damage to existing services.
- Hole Saw: Cuts circular access holes through the rear or base panel of the cabinet to route supply pipes and waste pipework cleanly through the unit.
- Jigsaw: Trims cabinet panels or worktops where pipework positions require a custom cutout that a hole saw cannot accommodate.
- Screwdriver: Secures cabinet fixings, basin brackets, and waste fittings. A cross-head and flat-head screwdriver are both required.
- Adjustable Spanner: Tightens compression fittings on supply pipes and waste trap connections without rounding off fittings.
- Slip-Joint Pliers: Grip and tighten plastic waste fittings, bottle trap rings, and overflow assemblies where a spanner cannot seat correctly.
- Pipe Cutter: Trims copper or plastic supply pipes to the correct length without collapsing the pipe bore. A rotary pipe cutter produces a cleaner cut than a hacksaw on supply pipes.
- Deburring Tool: Removes sharp burrs from the inside edge of cut copper pipe before fitting compression or push-fit connectors, preventing joint failure.
- Basin Wrench: Tightens basin tap back nuts in confined spaces beneath the basin where a standard spanner cannot reach.
- Hacksaw: Cuts waste pipe, overflow pipe, and plastic components to the required length.
- Pipe Bending Spring: Bends 15mm or 22mm copper pipe without kinking, used when repositioning supply pipe runs to align with the vanity unit connections.
- Silicone Gun: Applies silicone sealant in a controlled, consistent bead along cabinet edges and wall junctions.
- Utility Knife: Trims excess silicone sealant, cuts pipe insulation, and scores cabinet panels before cutting.
- Allen Key Set: Tightens grub screws on tap handles, cabinet hinges, and drawer runners supplied with the vanity unit.
- Tape Measure and Pencil: Marks fixing positions and confirms cabinet dimensions against the installation space before drilling.
- Bucket and Towels: Collects residual water when disconnecting existing waste and supply connections during replacement installations.
- Safety Goggles and Knee Pads: Required for overhead drilling and floor-level pipe work throughout the installation.
What Materials Are Needed to Install a Vanity Unit?
The materials needed to install a vanity unit are listed below:
- Wall Plugs and Screws: Secure the cabinet to the wall. Plastic raw plugs suit solid masonry walls; cavity wall anchors suit timber stud walls; M8 or M10 rawlbolts suit wall-hung units carrying significant load.
- Timber Batten: Fixed horizontally to the wall to support wall-hung vanity units, distributing the load across multiple wall fixings. Minimum 18mm plywood or 50mm x 50mm timber batten is recommended for wall-hung installations on stud walls.
- PTFE Tape: Wraps threaded pipe joints to create a watertight seal on supply connections, applied in a clockwise direction across the thread.
- Silicone Sealant: Applied along the rear and side edges of the vanity unit where the cabinet meets the wall and floor, preventing water ingress behind the unit. Sanitary-grade, mould-resistant silicone is required for bathroom installations.
- Flexi Hoses / Braided Hoses: Connect the isolation valves to the basin tap tails, accommodating minor alignment differences between the tap positions and supply pipe outlets. Standard UK size is 15mm compression to 1/2 inch BSP.
- Isolation Valves: Fit inline on the hot and cold supply pipes, allowing the water supply to the vanity unit to be isolated without shutting off the mains supply to the property.
- Compression Fittings or Push-Fit Connectors: Join supply pipes to isolation valves and flexi hoses. Compression fittings suit copper pipe; push-fit connectors suit plastic supply pipe such as PolyPipe or JG Speedfit.
- Bottle Trap or P-Trap: Connects the basin waste outlet to the waste pipe, retaining a water seal to prevent sewer gases entering the bathroom. A bottle trap suits concealed installations inside the vanity unit; a P-trap suits exposed or space-restricted installations.
- Waste Pipe — 32mm or 40mm: Routes wastewater from the bottle trap to the soil stack or existing waste outlet. 32mm waste pipe suits basin-only installations; 40mm suits combined basin and bath waste runs.
- Push-Fit Waste Fittings or Solvent Weld Fittings: Join waste pipe sections and connect to the existing waste outlet. Push-fit fittings allow disassembly for maintenance; solvent weld fittings create a permanent, rigid joint.
- Overflow Assembly: Connects the basin overflow outlet to the waste, preventing basin flooding. Supplied with most basins but requires a compatible waste fitting with an overflow slot.
- Click-Clack Waste or Slotted Waste: Fits the basin outlet and connects to the bottle trap. A click-clack waste operates by pressing to open and close; a slotted waste remains open and suits basins with a separate overflow.
- Pipe Clips and Brackets: Secure waste pipe runs to the wall at 500mm intervals, preventing pipe sag and maintaining the correct fall gradient of 18mm to 45mm per metre toward the soil stack.
- Expanding Foam or Pipe Collars: Seal gaps around pipework where supply or waste pipes pass through cabinet panels or wall surfaces, preventing draughts and moisture ingress.
- Masking Tape: Applied along cabinet edges before silicone application to produce a clean, straight sealant line.
- Primer for Plastic Waste Pipe: Applied to solvent weld joint surfaces before cement application, improving adhesion on ABS and PVC waste pipe systems.
What Do You Need to Know Before You Start Installing a Vanity Unit?

Before installing a vanity unit, turn off the water supply, check your wall type, confirm your pipework positions, make sure the floor is level, and verify the work complies with UK Building Regulations Part P.
Do You Need a Plumber to Install a Vanity Unit?
A plumber is required when the installation involves moving or altering existing pipework under UK Building Regulations Part P. Swapping an old vanity unit for a new one in the exact same position is classed as non-notifiable work — a competent DIYer handles this legally. Moving pipes, adding a new waste outlet, or connecting to the soil stack for the first time requires a Part P registered plumber.
What Are the UK Building Regulations for Vanity Unit Installation?
UK Building Regulations Part P classifies bathroom plumbing work as either notifiable or non-notifiable based on the extent of pipework changes involved.
- Non-Notifiable Work: Replacing an existing vanity unit and basin in the same position without moving any pipes.
- Notifiable Work: Installing a vanity unit in a new position, relocating supply pipes, or connecting to the soil stack for the first time.
Notifiable work requires a Part P registered tradesperson or a Building Regulations application submitted to the local authority before work begins.
What Wall Type Do You Have?
The wall type determines how the vanity unit is fixed and how much weight the wall safely holds.
The wall types found in UK bathrooms are listed below:
- Solid Masonry Wall: Brick or blockwork construction accepting standard plastic raw plugs with 50mm screws or M8 rawlbolts for heavier wall-hung units.
- Timber Stud Wall: A timber frame covered with plasterboard, requiring fixings directly into the timber studs or a continuous batten fixed across multiple studs to spread the load.
- Metal Stud Wall: A metal frame covered with plasterboard, requiring specialist metal stud fixings or a timber batten fixed through the frame into a solid backing board.
Use a stud and cable detector before drilling to locate studs and avoid hidden electrical cables and pipework.
Where Are the Existing Pipes?
The position of the existing hot and cold supply pipes and the waste outlet determines which vanity unit fits the space. Measure the gap between the hot and cold supply pipes — standard UK spacing is 180mm centre to centre. Check the height of the waste outlet from the floor — a standard UK basin waste outlet sits between 450mm and 500mm from the finished floor level. A bottle trap inside the vanity unit needs at least 300mm of clearance between the basin waste outlet and the waste pipe entry point in the wall.
Is the Floor Level?
An uneven floor causes wonky cabinet doors, poor drainage, and visible gaps under the vanity unit. Check the floor level across the full width of the installation area with a spirit level. A difference of no more than 3mm across the cabinet base is acceptable. Most freestanding and floor-standing vanity units include adjustable feet that compensate for floor irregularities of up to 20mm.
What Size Vanity Unit Fits the Space?
A vanity unit requires a minimum clearance of 400mm between the front of the unit and the nearest opposite wall, following BS 6465 bathroom layout guidance. Standard UK vanity unit widths run from 350mm for cloakroom units up to 1200mm for double basin units. Leave at least 150mm clearance on each side of the unit where it sits next to a wall, bath panel, or WC unit to allow silicone sealing and pipe access.
What to Check Before Removing an Old Vanity Unit?
Turn off the hot and cold water supply at the isolation valves or the mains stopcock before removing an existing vanity unit. Confirm the water is off by opening the basin taps after isolation. Place a bucket under the bottle trap before disconnecting the waste — residual water sits in the trap. Photograph the existing pipework before disconnecting anything to use as a reference during the new installation.
What About Electrics Near the Vanity Unit?
No electrical fittings are permitted directly above the basin up to 2.25m from the floor, defined as Zone 1 under BS 7671 IET Wiring Regulations. Shaver sockets and mirror isolator switches must sit outside Zone 1 or within Zone 2 using IP44-rated fittings. All electrical work in bathroom zones requires a Part P registered electrician.
How Do You Install a Vanity Unit Step by Step?

To install a vanity unit, turn off the water supply, remove the old unit, mark the wall, fix the cabinet, fit the tap and basin, connect the supply pipes, fit the bottle trap and waste pipe, seal the unit, then test for leaks.
Step 1: Turn Off the Water Supply
Turn the slot on each isolation valve a quarter turn until it sits across the pipe to close the hot and cold water supply. Open the basin taps to release residual pressure and confirm the water is fully off. Place a towel and bucket beneath the existing pipework before proceeding.
Step 2: Disconnect and Remove the Old Unit
Unscrew the flexi hoses from the isolation valves and detach the bottle trap from the basin waste outlet to disconnect the old unit. Place a bucket under the bottle trap before loosening — residual water drains immediately on disconnection. Use a basin wrench to unscrew the tap back nuts beneath the basin, lift the basin clear, then unscrew the wall fixings and remove the cabinet. Fill and sand any redundant fixing holes before proceeding.
Step 3: Mark the Wall and Check Levels
Hold the vanity unit against the wall, mark the top edge as a reference line, then use a spirit level to check the floor and cabinet position before drilling. Adjust the cabinet feet where the floor is uneven before marking fixing holes. Run a stud and cable detector across the full marked area to confirm no electrical cables or pipework sit behind the drilling positions.
Step 4: Prepare the Wall Fixings
Drill fixing holes using a masonry bit for brick or blockwork walls, a wood bit for timber stud walls, and insert wall plugs flush with the wall surface on masonry walls. For wall-hung vanity units on a timber stud wall, fix a continuous 18mm plywood batten horizontally across a minimum of two studs at the correct cabinet height — the batten distributes the cabinet and basin load across multiple fixing points rather than concentrating it on a single stud.
Step 5: Cut Pipe Access Holes in the Cabinet
Hold the cabinet against the wall, mark the exact entry points of the hot pipe, cold pipe, and waste outlet onto the cabinet rear or base panel, then cut the holes using a hole saw for circular entries or a jigsaw for larger cutouts. Keep holes as small as practically possible to prevent moisture and draughts entering the cabinet. Fit pipe collars or escutcheon plates around each hole after installation to cover gaps cleanly.
Step 6: Fix the Cabinet to the Wall
Position the cabinet on the adjusted feet or wall batten, insert the fixing screws, then check the spirit level across the top of the cabinet in both directions before tightening all fixings fully. A cabinet fixed out of level causes door misalignment and uneven water pooling in the basin. For wall-hung units, hook the cabinet onto the wall-mounted batten or hanging bracket and insert the lower fixing screws through the cabinet base into the wall.
Step 7: Fit the Tap and Basin Waste
Fit the basin tap and waste before placing the basin into the vanity unit — access to the tap back nuts and waste fittings is significantly easier with the basin clear of the cabinet. Insert the tap through the tap hole from above, place the rubber sealing washer beneath the tap base, then thread and tighten the back nut using a basin wrench until the tap sits firm and straight. Insert the click-clack or slotted waste through the basin outlet from above with a rubber sealing washer or plumber’s putty beneath the flange, thread the back nut from beneath, and tighten until the waste sits flush and watertight. Connect the overflow assembly to the waste body on basins with an integrated overflow channel.
Step 8: Seat the Basin Into the Vanity Unit
Apply a thin bead of silicone sealant around the top edge of the cabinet aperture or countertop surface, then lower the basin into position aligning the tap tails and waste outlet with the access holes cut in Step 5. Press the basin firmly into position and wipe away excess silicone immediately using a damp cloth. Allow the silicone to skin for 10 minutes before proceeding to pipe connections.
Step 9: Connect the Supply Pipes
Wrap the threaded tap tail connections with 3 to 4 layers of PTFE tape in a clockwise direction, connect the flexi hoses from the isolation valves to the basin tap tails, then tighten each nut hand-tight followed by a further half turn using an adjustable spanner. Connect the hot supply to the left tap tail and the cold supply to the right tap tail, following standard UK plumbing convention. Do not overtighten — brass flexi hose fittings strip under excessive force.
Step 10: Fit the Bottle Trap and Waste Pipe
Thread the bottle trap top nut onto the basin waste outlet finger-tight, tighten a further half turn using slip-joint pliers, then measure and cut the waste pipe to length between the bottle trap outlet and the wall waste entry point. The waste pipe requires a fall of between 18mm and 45mm per metre toward the wall — a flat or back-falling waste pipe causes slow drainage and blockages. Push-fit the waste pipe into the bottle trap outlet and wall waste fitting, confirming both connections are fully seated.
Step 11: Seal the Vanity Unit
Apply masking tape along both edges of every joint where the vanity unit meets the wall, floor, or adjacent surfaces, then apply a continuous bead of sanitary-grade mould-resistant silicone sealant in a single pass. Smooth the sealant with a wetted finger or sealant tool, then remove the masking tape immediately before the silicone begins to skin. Allow the silicone to cure for a minimum of 24 hours before exposing joints to water.
Step 12: Turn On the Water and Test for Leaks
Rotate each isolation valve slot a quarter turn to align with the pipe, open the basin taps slowly, and allow water to run for 60 seconds before inspecting every connection point for leaks. Run a dry tissue along each flexi hose connection, compression fitting, bottle trap joint, and waste pipe connection — tissue detects moisture at joints that appear dry to the eye. Tighten any leaking compression fittings a further quarter turn and retest. Confirm the basin drains freely and the overflow functions correctly before closing the vanity unit doors.
How Do You Install a Freestanding or Floor-Standing Vanity Unit?

To install a freestanding or floor-standing vanity unit, position the cabinet, level the feet, fix the rear bracket to the wall, fit the tap and waste, connect the supply pipes, fit the bottle trap, then seal and test.
The installation steps for a freestanding or floor-standing vanity unit are listed below:
- Turn off the water supply at the isolation valves and open the basin taps to release residual pressure.
- Position the cabinet in the installation area, aligning the rear panel with the supply pipes and waste outlet.
- Adjust the cabinet feet until the spirit level confirms the cabinet sits level across the full width and depth.
- Cut pipe access holes through the rear or base panel using a hole saw, aligning with the hot pipe, cold pipe, and waste outlet positions.
- Fix the rear bracket to the wall using the correct fixings for the wall type — raw plugs and screws for masonry, stud fixings for plasterboard walls.
- Fit the tap and basin waste with the basin clear of the cabinet, then seat the basin into the cabinet with a silicone bead beneath the basin edge.
- Connect the flexi hoses from the isolation valves to the tap tails using PTFE tape on all threaded connections.
- Fit the bottle trap to the basin waste outlet and connect the waste pipe with a fall of 18mm to 45mm per metre toward the wall outlet.
- Apply silicone sealant along the rear and side edges where the cabinet meets the wall and floor using sanitary-grade mould-resistant silicone.
- Turn on the isolation valves and run the taps for 60 seconds, checking every connection with dry tissue for moisture before closing the cabinet doors.
How Do You Install a Wall-Hung Vanity Unit?
To install a wall-hung vanity unit, fix a timber batten to the wall at the correct height, hook the cabinet onto the batten, secure the lower fixings, fit the tap and waste, connect the supply pipes, fit the bottle trap, then seal and test.
The installation steps for a wall-hung vanity unit are listed below:
- Turn off the water supply at the isolation valves and open the basin taps to release residual pressure.
- Mark the batten height on the wall using a tape measure and pencil — the cabinet base must sit at the correct height to align with the existing waste outlet and supply pipes.
- Run a stud and cable detector across the full marked area to locate studs and confirm no electrical cables or pipework sit behind the drilling positions.
- Fix the timber batten horizontally across a minimum of two studs using M8 rawlbolts on masonry walls or 80mm screws into timber studs — minimum 18mm plywood batten is recommended to distribute the combined load of the cabinet and basin.
- Check the batten is level using a spirit level across the full length before tightening fixings — an unlevel batten transfers directly to the cabinet and basin position.
- Cut pipe access holes through the rear panel of the cabinet using a hole saw, aligning with the hot pipe, cold pipe, and waste outlet positions.
- Hook the cabinet onto the batten and insert the lower fixing screws through the cabinet base into the wall to prevent the unit pulling forward under load.
- Fit the tap and basin waste with the basin clear of the cabinet, then seat the basin into the cabinet with a silicone bead beneath the basin edge.
- Connect the flexi hoses from the isolation valves to the tap tails using PTFE tape on all threaded connections.
- Fit the bottle trap to the basin waste outlet and connect the waste pipe with a fall of 18mm to 45mm per metre toward the wall outlet — wall-hung installations require the waste pipe to be routed within the wall or boxed in to maintain the floating appearance of the unit.
- Apply silicone sealant along the rear and side edges where the cabinet meets the wall using sanitary-grade mould-resistant silicone.
- Turn on the isolation valves and run the taps for 60 seconds, checking every connection with dry tissue for moisture before closing the cabinet doors.
How Do You Install a Vanity Unit in a Cloakroom?

To install a vanity unit in a cloakroom, confirm the unit fits the space, turn off the water, fix the cabinet, fit the tap and waste, connect the supply pipes, fit the bottle trap, then seal and test.
Cloakroom vanity units measure between 350mm and 500mm in width. Restricted space makes pipe access and waste routing more demanding than a standard bathroom installation.
The installation steps for a cloakroom vanity unit are listed below:
- Confirm the Unit Dimensions: Check the unit fits the wall space — a minimum clearance of 400mm is required between the front face and the opposite wall, following BS 6465 guidance.
- Turn Off the Water Supply: Turn each isolation valve slot a quarter turn across the pipe, then open the basin taps to confirm the water is fully off.
- Mark the Fixing Positions: Mark the wall using a tape measure, pencil, and spirit level — tiled walls require a tile drill bit before switching to a masonry bit.
- Run a Stud and Cable Detector: Scan the marked area to confirm no cables or pipework sit behind the drilling positions.
- Cut Pipe Access Holes: Cut through the rear or base panel using a hole saw, aligning holes with the supply pipes and waste outlet before fixing the cabinet.
- Fix the Cabinet to the Wall: Secure using raw plugs and screws for masonry walls or cavity wall anchors for plasterboard stud walls.
- Check the Cabinet is Level: Place a spirit level across the top in both directions and tighten all fixings only after confirming the cabinet sits fully level.
- Fit the Tap and Basin Waste: Fit both the tap and waste with the basin clear of the cabinet — a basin wrench is essential due to restricted access on compact cloakroom basins.
- Seat the Basin Into the Cabinet: Apply a silicone bead beneath the basin edge, lower the basin into the cabinet, and align the tap tails and waste outlet with the access holes.
- Connect the Flexi Hoses: Wrap all threaded tap tail connections with PTFE tape and connect the flexi hoses to the tap tails before seating the basin where cabinet space is too restricted to work afterwards.
- Fit the Bottle Trap: Thread the bottle trap onto the basin waste outlet and tighten using slip-joint pliers — a slimline or angled bottle trap suits cloakroom installations where standard trap clearance is unavailable.
- Connect the Waste Pipe: Cut the waste pipe to length and push-fit into the bottle trap outlet and wall waste entry, maintaining a fall of 18mm to 45mm per metre — fix pipe clips at 500mm intervals across longer waste runs to the soil stack.
- Apply Silicone Sealant: Run a continuous bead of sanitary-grade mould-resistant silicone along every joint where the cabinet meets the wall and floor, then allow 24 hours curing time before exposing to water.
- Turn On the Water and Test for Leaks: Rotate each isolation valve a quarter turn to open, run the taps for 60 seconds, and check every connection with dry tissue for moisture before closing the cabinet doors.
What Are the Most Common Vanity Unit Installation Mistakes and How Do You Avoid Them?

The most common vanity unit installation mistakes are incorrect wall fixings, an unlevel cabinet, no PTFE tape on threaded connections, incorrect waste pipe fall, premature silicone exposure to water, and skipping the stud and cable detection check.
The common vanity unit installation mistakes and how to avoid them are listed below:
- Using the Wrong Wall Fixings: Standard plastic raw plugs used on plasterboard stud walls fail under the combined weight of the cabinet and basin — use cavity wall anchors on plasterboard and M8 rawlbolts on masonry walls for wall-hung units.
- Fixing the Cabinet Out of Level: A cabinet fixed even 3mm out of level causes misaligned doors, uneven basin drainage, and visible gaps along the sealant line — always check the spirit level across the top of the cabinet in both directions before tightening any fixings.
- Skipping the Stud and Cable Detector: Drilling without scanning the wall first risks hitting concealed electrical cables or pipework — run a stud and cable detector across the full drilling area before picking up the drill.
- Not Using PTFE Tape on Threaded Connections: Dry threaded connections on tap tails and flexi hose fittings leak under water pressure — wrap every threaded connection with 3 to 4 layers of PTFE tape in a clockwise direction before tightening.
- Overtightening Tap Back Nuts on Ceramic Basins: Excessive torque on tap back nuts cracks ceramic basins at the tap hole — tighten the back nut until firm using a basin wrench, then stop without forcing further.
- Incorrect Waste Pipe Fall: A waste pipe fitted flat or back-falling toward the cabinet causes slow drainage and standing water in the bottle trap — maintain a consistent fall of 18mm to 45mm per metre toward the wall outlet.
- Fitting the Tap and Waste After Seating the Basin: Fitting the tap and waste with the basin already inside the cabinet makes access to back nuts near impossible in compact units — always fit the tap and waste with the basin clear of the cabinet.
- Sealing the Unit Before Testing for Leaks: Applying silicone before running a leak test traps moisture behind the cabinet — complete all pipe connections, run the taps for 60 seconds, and confirm zero leaks before applying any sealant.
- Using Non-Sanitary Silicone: Standard decorator’s silicone breaks down in wet bathroom conditions within months — use sanitary-grade mould-resistant silicone on all joints where the cabinet meets the wall and floor.
- Exposing Silicone to Water Before Full Cure: Running water against fresh silicone within 24 hours prevents a full watertight cure — allow a minimum of 24 hours curing time before using the basin.
- Incorrect Bottle Trap Clearance: A standard bottle trap fitted in a compact cloakroom unit with insufficient clearance between the waste outlet and wall entry causes the trap to compress, breaking the water seal — use a slimline or angled bottle trap where clearance is under 300mm.
- Not Photographing Existing Pipework Before Disconnection: Removing the old unit without photographing the pipe configuration first creates confusion during reconnection — photograph the existing supply and waste connections before disconnecting anything.
How Do You Remove an Old Vanity Unit Before Installing a New One?
To remove an old vanity unit, turn off the water supply, disconnect the flexi hoses, detach the bottle trap, unscrew the tap back nuts, lift the basin clear, then unscrew the wall fixings and remove the cabinet.
The steps to remove an old vanity unit are listed below:
- Turn Off the Water Supply: Turn each isolation valve slot a quarter turn across the pipe, then open the basin taps to release residual pressure and confirm the water is fully off.
- Photograph the Existing Pipework: Photograph the supply pipe connections, waste configuration, and wall fixing positions before disconnecting anything — use the photographs as a reference during the new installation.
- Place a Bucket Under the Bottle Trap: Position a bucket directly beneath the bottle trap before loosening any waste connections — residual water drains immediately on disconnection.
- Disconnect the Flexi Hoses: Unscrew the flexi hose nuts from the isolation valves using an adjustable spanner, then unscrew from the tap tails and remove the hoses completely.
- Detach the Bottle Trap: Unscrew the top nut of the bottle trap from the basin waste outlet by hand or using slip-joint pliers, then pull the trap clear and empty residual water into the bucket.
- Unscrew the Tap Back Nuts: Access the tap back nuts beneath the basin using a basin wrench and unscrew until the tap pulls free from the basin tap hole.
- Cut the Silicone Seal: Run a utility knife along the silicone sealant line where the basin meets the cabinet and where the cabinet meets the wall — cutting the silicone prevents the basin and cabinet tearing away wall tiles or surface finishes during removal.
- Lift the Basin Clear: Lift the basin straight up and out of the cabinet aperture, then set aside on a protected surface to avoid chipping.
- Unscrew the Cabinet Wall Fixings: Locate and unscrew all wall fixings securing the cabinet to the wall — wall-hung units release from the hanging batten by lifting the cabinet upward and pulling forward.
- Remove the Cabinet: Pull the cabinet clear of the wall and remove from the installation area.
- Prepare the Wall Surface: Fill redundant fixing holes with filler, sand flush once dry, and remove any old silicone residue from the wall and floor surface using a silicone remover or utility knife before fitting the new unit.
How Much Does It Cost to Install a Vanity Unit in the UK?

Vanity unit installation in the UK costs between £150 and £600 including labour, with the average plumber charging between £40 and £60 per hour and a standard installation taking between 2 and 4 hours to complete.
What Is the Labour Cost to Install a Vanity Unit in the UK?
A plumber charges between £40 and £60 per hour in the UK for vanity unit installation, with total labour costs ranging from £80 to £240 depending on installation complexity and region.
- Standard Replacement Installation: A like-for-like vanity unit swap on existing pipework costs between £80 and £150 in labour, taking 2 to 3 hours to complete.
- New Installation With Pipework Alterations: A new vanity unit installation requiring supply pipe or waste pipe relocation costs between £150 and £400 in labour, taking 4 to 6 hours to complete.
- London and South East: Labour rates in London and the South East run 20% to 30% higher than the UK national average, with hourly rates reaching £70 to £90 per hour.
What Are the Additional Costs of Vanity Unit Installation?
Additional costs beyond labour include materials, waste disposal, and call-out fees, adding between £50 and £150 to the total installation cost.
The additional costs for vanity unit installation are listed below:
- Call-Out Fee: Most UK plumbers charge a call-out fee of between £50 and £100 on top of the hourly labour rate.
- Materials: Flexi hoses, PTFE tape, silicone sealant, wall plugs, and pipe fittings cost between £20 and £50 for a standard installation.
- Isolation Valves: New isolation valves cost between £5 and £15 each — a standard vanity unit installation requires 2 isolation valves, one for hot and one for cold supply.
- Bottle Trap: A replacement bottle trap costs between £8 and £25 depending on finish — chrome and brushed brass finishes sit at the higher end of the price range.
- Waste Disposal: Removing and disposing of the old vanity unit adds between £20 and £50 to the total cost where the plumber removes the old unit as part of the job.
Is It Cheaper to Install a Vanity Unit Yourself?
A DIY vanity unit installation on existing pipework costs between £20 and £50 in materials, saving between £80 and £240 in labour costs compared to hiring a plumber. DIY installation is legally permissible for like-for-like replacements on existing pipework under UK Building Regulations Part P. Any work involving new pipework runs, waste pipe relocation, or soil stack connections requires a Part P registered plumber regardless of cost savings.
How Do You Maintain a Vanity Unit After Installation?

To maintain a vanity unit, clean the basin and cabinet weekly, inspect silicone seals every 3 months, check pipe connections for leaks every 3 months, replace flexi hoses every 5 years, and clean the bottle trap every 6 months.
How Do You Clean a Vanity Unit?
Clean a vanity unit using a soft cloth with a mild non-abrasive bathroom cleaner — abrasive cleaners and bleach-based products damage cabinet finishes, basin surfaces, and silicone sealant.
- Basin Surface: Wipe with a damp soft cloth after each use to prevent limescale buildup — hard water areas including London, the South East, and the Midlands accumulate limescale faster than soft water areas.
- Cabinet Exterior: Clean weekly using a mild bathroom spray — prolonged moisture exposure causes MDF panels to swell and delaminate.
- Tap and Waste Fittings: Wipe with a damp cloth only — chemical cleaners strip protective coatings from chrome, brushed brass, and matt black finishes within weeks.
How Do You Maintain the Silicone Sealant?
Inspect silicone sealant every 3 months — cracked, shrinking, or mould-affected sealant requires full removal and resealing to prevent water ingress behind the cabinet. Bathroom silicone sealant lasts between 3 and 5 years. Remove old sealant using a silicone remover and utility knife, clean with isopropyl alcohol, apply fresh sanitary-grade mould-resistant silicone, and allow 24 hours curing time before exposing to water.
How Do You Maintain the Pipework?
Check every flexi hose, compression fitting, and bottle trap joint for moisture every 3 months — undetected leaks cause cabinet swelling, floor damage, and mould growth.
- Flexi Hoses: Replace every 5 years — internal rubber linings fail without visible external signs, causing sudden flooding.
- Isolation Valves: Turn each valve on and off twice yearly to prevent seizing in the open position.
- Bottle Trap: Unscrew and clean every 6 months to remove hair and soap residue causing slow drainage.
How Do You Prevent Mould?
Prevent mould by maintaining bathroom ventilation, wiping cabinet surfaces dry after use, and using mould-resistant silicone on all sealed joints. Bathrooms without mechanical ventilation experience condensation levels up to 40% higher than ventilated bathrooms. An extractor fan rated at a minimum of 15 litres per second, as required by UK Building Regulations Part F, extends the lifespan of cabinet finishes and silicone seals.
How Do You Fix a Slow-Draining Basin?
A slow-draining vanity unit basin results from debris buildup in the bottle trap — unscrew the bottle trap, clear the obstruction, refit, and run the basin for 60 seconds to confirm full drainage. A basin draining slowly after trap cleaning indicates a partial blockage in the waste pipe — use a drain rod or proprietary drain cleaner to clear the waste pipe run.
How Long Does It Take to Install a Vanity Unit?

A standard vanity unit installation takes between 2 and 4 hours for a like-for-like replacement on existing pipework, and between 4 and 8 hours for a new installation requiring pipework alterations.
What Affects Vanity Unit Installation Time?
Installation time changes based on wall type, pipework complexity, unit type, and whether the existing unit requires removal first.
- Like-for-Like Replacement: Takes 2 to 3 hours — existing pipework positions are retained and no alterations to supply or waste pipes are required.
- New Installation With Pipework Alterations: Takes 4 to 8 hours — supply pipe relocation, new waste runs, or soil stack connections extend the installation time significantly.
- Wall-Hung Vanity Unit: Takes 30 to 60 minutes longer than a freestanding installation — batten fixing, load distribution, and concealed waste pipe routing add time to the process.
- Cloakroom Vanity Unit: Takes 2 to 3 hours — compact dimensions restrict access to pipe connections and cabinet fixings, slowing each stage of the installation.
- Tiled Walls: Add 30 to 60 minutes — drilling through tiles requires a tile drill bit, slower drilling speed, and additional care to avoid cracking the tile surface.
How Long Does the Silicone Sealant Take to Cure?
Sanitary-grade silicone sealant takes a minimum of 24 hours to cure fully before the vanity unit basin accepts water use. Exposing fresh silicone to water before full cure prevents a watertight seal from forming, requiring full removal and reapplication.