
Basin waste installation involves selecting the correct waste type, preparing the basin outlet, assembling washers and backnuts in order, aligning the overflow, securing the trap, and confirming watertight performance through structured testing.
Basin waste function depends on matching slotted or unslotted designs to basin overflow channels, using appropriate tools, applying controlled sealant, and maintaining correct washer compression. Basin material influences sealing behaviour because ceramic, resin, stone, glass, and composite basins require different tightening forces and washer types.
Installation quality depends on correct trap selection, accurate alignment, and secure compression joints that maintain a stable water seal. UK regulations shape installation expectations by requiring watertight joints, compliant trap seals, and overflow compatibility. Common problems include flange leaks, washer misalignment, overflow misalignment, loose backnuts, and trap joint failures.
Professional installation cost ranges typically fall between £60 and £150 in the UK, with variations based on access and component condition. Homeowners complete straightforward installations, while complex or damaged systems require professional support. Safety steps such as isolating water flow, clearing workspace access, and avoiding overtightening protect the basin and surrounding surfaces during installation.
What Is a Basin Waste and Why Does It Need Fitting?
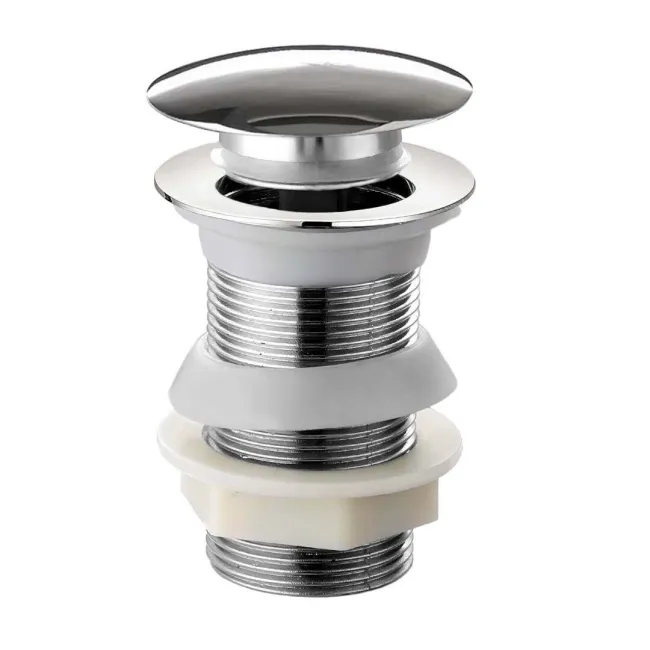
A basin waste is a drainage fitting that manages basin water release and needs fitting to create a sealed outlet that prevents leakage and maintains stable wastewater flow into domestic pipework. Basin waste construction includes the waste body, sealing washers, and backnut, and these components form a watertight junction at the basin opening.
Basin waste categories include slotted models for basins with overflow channels, unslotted models for basins without overflow channels, click-clack mechanisms with push-activated valves, and flip-top mechanisms with rotating plates, and these mechanisms regulate water retention and discharge with consistent flow control. Basin waste fitting remains necessary because correct positioning, uniform washer compression, and secure backnut tightening maintain drainage integrity, protect surrounding surfaces, and support reliable outflow during repeated basin use.
What Are the Different Types of Basin Wastes Available?
The different types of basin wastes include slotted wastes, unslotted wastes, click-clack wastes, flip-top wastes, plug-and-chain wastes, free-flow wastes, and pop-up wastes, and each type delivers a distinct drainage mechanism based on basin design and overflow function.
Slotted Basin Wastes

Slotted basin wastes regulate drainage in basins with overflow channels by aligning integrated slots with the overflow route to maintain continuous discharge control.
Unslotted Basin Wastes
Unslotted basin wastes regulate drainage in basins without overflow channels by creating a sealed single-path outlet that manages retained and released water.
Click-Clack Basin Wastes

Click-clack basin wastes regulate drainage through spring-activated push plates that open and close the waste aperture with controlled vertical valve movement.
Flip-Top Basin Wastes

Flip-top basin wastes regulate drainage through rotating discs that pivot across a fixed axis to seal or release water during basin use.
Plug-and-Chain Basin Wastes

Plug-and-chain basin wastes regulate drainage through manually positioned stoppers attached to metal chains that form a removable seal at the waste opening.
Free-Flow Basin Wastes

Free-flow basin wastes regulate drainage by remaining permanently open to allow unrestricted water passage, preventing water retention and eliminating overflow risk.
Pop-Up Basin Wastes

Pop-up basin wastes regulate drainage through lever-controlled lift mechanisms that raise or lower the stopper from a linkage connected behind the tap.
What Tools and Materials Are Needed to Fit a Basin Waste?
The tools and materials needed to fit a basin waste include a basin spanner, adjustable spanner, plumber’s putty, PTFE tape, silicone sealant, sealing washers, and a trap assembly, and each item supports secure tightening, sealing, and drainage alignment during installation.
Basin Spanner
A basin spanner applies controlled torque to the backnut beneath the basin waste to secure the threaded connection without damaging the fitting.
Adjustable Spanner
An adjustable spanner supports trap connection tightening by gripping variable nut sizes across the waste outlet assembly.
Plumber’s Putty
Plumber’s putty forms a malleable sealing layer between the waste flange and the ceramic basin surface to minimise leakage during water retention.
PTFE Tape
PTFE tape reinforces threaded waste connections by reducing friction and improving watertight performance across the joined components.
Silicone Sealant
Silicone sealant strengthens the upper and lower sealing interfaces by providing a flexible moisture-resistant bond around the waste opening.
Sealing Washers
Sealing washers create compression seals between the waste body and the basin to maintain controlled water retention and release.
Trap Assembly
A trap assembly completes the drainage route by connecting to the basin waste outlet and maintaining a water seal that prevents odour backflow.
Additional Supporting Items
Supporting items include a bucket for wastewater collection, a cloth for surface cleaning, and a tape measure for verifying trap alignment.
How Do You Choose the Right Basin Waste for Your Basin?
The right basin waste is the waste type that matches the basin’s overflow design, valve preference, and drainage function, and selection depends on overflow presence, operation mechanism, and intended water-control behaviour.
Overflow Compatibility
Overflow compatibility determines waste type selection because basins with overflow channels require slotted basin wastes that align the overflow route with integrated slots, while overflow-free basins require unslotted basin wastes that create a sealed single-path outlet.
Operation Mechanism
Operation mechanism influences basin waste selection through valve behaviour: click-clack wastes use spring-loaded push plates, flip-top wastes use rotating discs, pop-up wastes use lever-controlled stoppers, and plug-and-chain wastes use removable stoppers for manual sealing.
Drainage Behaviour
Drainage behaviour guides selection because free-flow wastes maintain permanent open drainage for continuous outflow, while retention-capable wastes create controlled seals for water-holding tasks such as washing or soaking.
Material and Finish Considerations
Material and finish considerations refine basin waste choice because brass, stainless-steel, and chrome-plated finishes maintain durability, corrosion resistance, and visual consistency with taps, traps, and other basin fittings.
Dimensional Compatibility
Dimensional compatibility ensures correct fitting because waste bodies must match common basin waste diameters such as 32 mm or 40 mm and must align smoothly with trap assemblies for reliable drainage.
What Preparation Steps Are Needed Before Fitting a Basin Waste?
The preparation steps needed before fitting a basin waste include cleaning the basin outlet, checking waste components, verifying overflow type, aligning the trap position, and preparing sealing materials, and each step ensures a stable and watertight installation.
Clean the Basin Outlet
Cleaning the basin outlet removes debris, residue, and surface moisture to improve adhesion for sealing compounds and ensure uniform compression across the sealing washers.
Check All Waste Components
Checking all waste components confirms the presence of the waste body, sealing washers, backnut, and flange, and this verification prevents assembly gaps during installation.
Verify the Basin Overflow Type
Verifying the overflow type determines whether a slotted or unslotted waste is required and ensures compatibility between the waste body and the basin design.
Align the Trap Position
Aligning the trap position ensures that the trap inlet sits directly beneath the waste outlet to support correct drainage geometry and stable flow transfer.
Prepare Sealing Materials
Preparing sealing materials such as plumber’s putty, silicone sealant, and PTFE tape ensures immediate access to sealing products during assembly and maintains continuous workflow.
Arrange Tools for Installation
Arranging tools such as basin spanners and adjustable spanners provides controlled tightening and supports accurate fastening of the waste body and trap connections.
How Do You Remove an Old Basin Waste?
The steps to remove an old basin waste include isolating water flow, collecting residual water, disconnecting the trap, loosening the backnut, breaking the seal, and lifting the waste body out, and these steps ensure controlled and safe disassembly.
Isolate Water Flow
Isolating water flow prevents uncontrolled discharge by closing supply valves and opening the tap to release remaining water from the basin system.
Collect Residual Water
Collecting residual water with a bucket beneath the trap captures standing water from the waste outlet and prevents surface-level spillage during removal.
Disconnect the Trap
Disconnecting the trap separates the lower drainage assembly by unscrewing the compression nuts and lowering the trap away from the waste connection.
Loosen the Backnut
Loosening the backnut releases the threaded interface between the waste body and the basin outlet, and a basin spanner provides controlled torque for this step.
Break the Seal
Breaking the seal removes hardened putty or silicone around the waste flange by applying upward pressure or using a scraper to release the adhered material.
Lift the Waste Body Out
Lifting the waste body out clears the basin opening and prepares the outlet surface for cleaning and subsequent installation of a new waste.
How Do You Fit a Slotted Basin Waste Step by Step?
To fit a slotted basin waste correctly, prepare the work area, clean the basin outlet, assemble the slotted body and washers in order, align the overflow slots, tighten the backnut, reconnect the trap, and complete a standing-water leak test.
Step 1: Prepare the Work Area
Clearing the cupboard space, removing stored items, and placing dust sheets or towels beneath the basin protects surrounding surfaces and provides safe access to the underside of the basin.
Step 2: Gather Tools and Materials
Gathering a basin spanner, adjustable spanner, plumber’s putty or suitable sealant, PTFE tape, new slotted basin waste, washers, and trap components ensures continuous workflow during the slotted basin waste installation.
Step 3: Confirm Basin Overflow and Waste Type
Confirming the presence of a basin overflow and matching the basin with a slotted basin waste prevents incorrect pairing and ensures that overflow water can discharge into the slotted waste body.
Step 4: Remove the Old Basin Waste
Removing the old basin waste by disconnecting the trap, loosening the backnut, breaking the existing seal, and lifting the waste body out clears the outlet for the new slotted basin waste.
Step 5: Clean and Dry the Basin Outlet
Cleaning the basin outlet with a scraper and cloth removes old putty, silicone, limescale, and debris, and drying the ceramic surface creates an even contact area for the slotted basin waste flange and upper seal.
Step 6: Dry-Fit the Slotted Basin Waste
Dry-fitting the slotted basin waste without sealant checks that the threaded length, washer positions, and outlet orientation align with the basin thickness and the trap position beneath the basin.
Step 7: Apply Sealant Under the Flange
Applying a continuous, even ring of suitable sealant or plumber’s putty beneath the slotted basin waste flange forms the primary watertight barrier between the metal flange and the basin outlet surface.
Step 8: Position the Upper Washer
Positioning the upper washer beneath the flange or beneath the basin rim according to the manufacturer’s arrangement distributes pressure evenly and supports uniform compression during tightening.
Step 9: Insert the Slotted Waste and Align the Overflow
Inserting the slotted basin waste body from above through the outlet and rotating the body until the slots align directly with the basin overflow opening creates a correct overflow discharge path into the waste.
Step 10: Fit the Lower Washer and Backnut
Fitting the lower washer on the underside of the basin and threading the backnut onto the slotted basin waste body forms the lower seal and locks the assembly in position ready for tightening.
Step 11: Hold the Waste Flange and Hand-Tighten the Backnut
Holding the waste flange firmly from above while hand-tightening the backnut from below prevents rotation of the slotted basin waste body and maintains the alignment between the slots and the overflow.
Step 12: Tighten the Backnut With a Basin Spanner
Tightening the backnut with a basin spanner increases compression across the upper and lower washers, and controlled incremental tightening secures the slotted basin waste without stressing the ceramic basin.
Step 13: Remove Excess Sealant Around the Flange
Removing excess sealant squeezed out around the flange with a cloth or plastic scraper creates a clean finish and prevents hardened sealant from obstructing the overflow opening.
Step 14: Apply PTFE Tape to the Waste Outlet Threads
Applying PTFE tape to the external threads of the slotted basin waste outlet improves the seal at the trap connection and reduces the risk of minor weeping at the threaded joint.
Step 15: Reconnect and Align the Trap
Reconnecting the trap by tightening the compression nut onto the slotted basin waste outlet and aligning the trap with the downstream pipework restores the water seal in the drainage system.
Step 16: Check All Nuts and Compression Joints
Checking every nut and compression joint by hand confirms that the backnut, trap nuts, and any extension pieces sit snugly without over-tightening that could damage seals or threads.
Step 17: Perform a Static Fill Leak Test
Performing a static fill test by closing the waste mechanism, filling the basin with water above the overflow level, and leaving the water standing for several minutes verifies that no droplets emerge around the flange, underside washers, or trap joints.
Step 18: Test the Overflow and Drain-Down
Testing the overflow and drain-down by running water into the basin with the waste open confirms that overflow water enters the slots correctly and that continuous discharge occurs through the trap without visible leakage.
What Type of Trap Should You Use and How Do You Fit It?
The correct trap type for a basin is the trap that maintains a water seal, aligns with the waste outlet, and matches the available space, and fitting involves sealing the threads, tightening the compression joints, and confirming leak-free drainage.
Bottle Trap Selection
Bottle traps provide vertical water seals using cylindrical chambers, and these chambers suit exposed installations because the compact geometry presents a neat appearance beneath basins.
P-Trap Selection
P-traps provide curved water seals using fixed U-shaped bends, and these bends suit basins positioned close to wall outlets where horizontal alignment remains constant.
S-Trap Selection
S-traps provide extended water seals using vertical bends, and these bends suit basins with floor-level waste connections where downward outlet routing is required.
Shallow Trap Selection
Shallow traps provide reduced-depth water seals using compact bodies, and these bodies suit space-restricted vanity units where limited clearance prevents deeper trap installation.
How to Fit a Basin Trap Step by Step
Step 1: Check Alignment
Checking alignment ensures that the trap inlet lines up directly with the basin waste outlet and that the outlet pipe matches the wall or floor connection.
Step 2: Apply PTFE Tape to Threaded Sections
Applying PTFE tape to the threaded trap inlet strengthens the seal between the trap and the basin waste outlet by reducing friction and improving watertight contact.
Step 3: Position the Compression Washer
Positioning the compression washer inside the trap nut creates the sealing face that compresses around the pipe when tightened.
Step 4: Connect the Trap to the Basin Waste Outlet
Connecting the trap by sliding the nut and washer over the waste outlet and tightening the nut by hand secures the upper connection before final tightening.
Step 5: Connect the Outlet Pipe
Connecting the trap outlet to the wall or floor pipe and tightening the compression joint creates the lower drainage pathway.
Step 6: Tighten All Compression Nuts
Tightening all compression nuts with controlled force stabilises the trap assembly and maintains uniform sealing pressure across the washers.
Step 7: Test the Trap for Leaks
Testing the trap by running water, checking the water seal, and inspecting every joint ensures watertight performance during basin use.
How Do You Check a Newly Fitted Basin Waste for Leaks?
A newly fitted basin waste is checked for leaks by running water, inspecting the flange, examining the underside seals, testing the trap joints, and performing a standing-water test, and each action confirms watertight performance.
Step 1: Run Water Through the Basin
Running water through the basin activates the drainage path and reveals immediate leaks around the slotted or unslotted basin waste connection.
Step 2: Inspect the Waste Flange
Inspecting the waste flange identifies moisture escape around the sealant ring or upper washer, and a dry tissue pressed lightly around the flange highlights small seepages.
Step 3: Check Underside Washers and Backnut
Checking underside washers and the backnut confirms that compression remains uniform, and visual inspection detects drips forming beneath the basin outlet.
Step 4: Examine the Trap Inlet Joint
Examining the trap inlet joint verifies that PTFE tape and compression washers provide an adequate seal between the basin waste outlet and the trap inlet.
Step 5: Inspect the Trap Outlet Joint
Inspecting the trap outlet joint confirms that the downstream compression nut maintains a watertight connection with the waste pipe.
Step 6: Perform a Standing-Water Test
Performing a standing-water test by filling the basin above overflow level and leaving the water for several minutes detects slow leaks that occur under prolonged pressure.
Step 7: Test Overflow Alignment
Testing overflow alignment confirms that overflow water enters the waste slots correctly without leaking around the internal overflow opening.
Step 8: Recheck All Joints After Drain-Down
Rechecking all joints after releasing the water ensures that no delayed drips form once the drainage pressure shifts from static to dynamic flow.
What Are the Most Common Basin Waste Fitting Problems?
The most common basin waste fitting problems include flange leaks, washer misalignment, overflow misalignment, loose backnuts, cracked sealant bonds, and trap joint leaks, and each problem disrupts watertight drainage performance.
Flange Leaks
Flange leaks occur when sealant coverage is uneven or insufficient, and moisture escapes around the upper contact between the basin outlet and the waste flange.
Washer Misalignment
Washer misalignment occurs when upper or lower washers sit off-centre, and uneven compression creates small gaps that allow water to seep beneath the basin.
Overflow Misalignment
Overflow misalignment occurs when the slotted waste body rotates during tightening, and the overflow channel fails to line up with the slots, causing internal leakage.
Loose Backnuts
Loose backnuts occur when tightening is incomplete, and the waste body shifts under water pressure, breaking the seal between the basin and the washers.
Cracked or Gapped Sealant
Cracked or gapped sealant occurs when old sealant is applied over residue or when the flange moves after curing, and gaps allow water to pass into the underside cavity.
Trap Inlet Leaks
Trap inlet leaks occur when compression washers deform or sit incorrectly inside the trap nut, and water escapes at the waste-to-trap connection.
Trap Outlet Leaks
Trap outlet leaks occur when the outlet pipe joint is misaligned or insufficiently tightened, and leaks appear where the trap connects to the downstream waste pipe.
Cross-Threaded Waste Body
Cross-threaded waste body connections occur when the backnut threads incorrectly on the waste shaft, and angled tightening prevents full compression of the washers.
Basin Surface Imperfections
Basin surface imperfections occur when chips or irregularities around the outlet interrupt the flange seal, and water escapes through micro-gaps beneath the waste flange.
Should a Homeowner Fit a Basin Waste Themselves or Hire a Plumber?
A basin waste should be fitted by the person who can ensure correct sealing, alignment, and leak-free drainage, and this decision depends on technical confidence, tool availability, and the condition of the basin and pipework.
When a Homeowner Fits a Basin Waste
A homeowner fits a basin waste when the installation involves straightforward removal, simple alignment, accessible pipework, and standard slotted or unslotted waste components that require only basic tightening and sealing.
When a Plumber Fits a Basin Waste
A plumber fits a basin waste when complex factors exist, including corroded fittings, misaligned traps, damaged ceramic outlets, restricted access inside vanity units, or repeated leaks caused by washer deformation or flawed sealant bedding.
Risk Considerations
Risk considerations include incorrect overflow alignment, insufficient washer compression, overtightening that cracks ceramic surfaces, and undetected slow leaks that damage surrounding structures during routine basin use.
Outcome Expectations
Outcome expectations differ because correct fitting ensures watertight operation, stable trap performance, and reliable daily drainage, while incorrect fitting increases the likelihood of ongoing leaks, odour issues, or structural moisture damage.
What Safety Steps Should Be Followed During Basin Waste Installation?
The safety steps for basin waste installation include isolating water flow, clearing the work area, using correct tools, supporting the basin structure, and checking stability during tightening, and these steps prevent injury and protect surrounding surfaces.
Isolate Water Flow
Isolating water flow by closing supply valves and opening the tap releases residual pressure and prevents unexpected discharge during basin waste installation.
Clear the Work Area
Clearing the work area removes stored items and sharp objects beneath the basin, and this clearance prevents obstruction and improves access to the waste outlet and trap.
Use Correct Tools
Using correct tools such as basin spanners and adjustable spanners prevents accidental slippage, reduces strain on fittings, and maintains controlled tightening during installation.
Support the Basin Structure
Supporting the basin structure by avoiding excessive upward or downward force on the waste body prevents stress fractures across the ceramic outlet.
Protect Surrounding Surfaces
Protecting surrounding surfaces with towels or dust sheets shields flooring, cabinets, and countertops from drips, displaced debris, or accidental impacts.
Maintain Stable Body Positioning
Maintaining stable body positioning beneath the basin prevents overreaching and ensures steady hand placement on tools and fittings.
Avoid Over-Tightening
Avoiding over-tightening during backnut and trap assembly prevents washer deformation, thread damage, and cracking of the basin material.
Check for Electrical Hazards
Checking for nearby electrical sources such as shaver sockets or illuminated mirrors prevents accidental contact with moisture during installation.
Ventilate the Area When Using Sealants
Ventilating the area when applying silicone or sealant reduces exposure to curing fumes and supports safe working conditions.
What Does a Professional Basin Waste Installation Typically Cost in the UK?
A professional basin waste installation in the UK typically costs £60–£150, and this range reflects labour duration, access constraints, and the condition of existing drainage components.
Labour Duration
Labour duration affects cost because UK plumbing labour commonly ranges between £40 and £60 per hour, and basin waste installation time determines the final charge within the £60–£150 range.
Access Constraints
Access constraints influence pricing when the basin sits inside a confined vanity unit or behind restricted pipework, and increased installation time moves the total cost toward the upper boundary.
Condition of Existing Drainage Components
Condition of existing drainage components alters pricing when corroded backnuts, cracked traps, or damaged washers require replacement before the basin waste installation proceeds.
Additional Material Requirements
Additional material requirements increase total cost when new traps, extended waste fittings, silicone sealant, or PTFE tape are supplied during installation.
How Does Basin Material Affect Waste Choice and Installation Method?
Basin material affects waste choice and installation method by changing sealing requirements, compression behaviour, and flange compatibility, and each material demands a specific sealing approach to create a watertight basin waste connection.
Ceramic Basin Influence
Ceramic basin influence arises because ceramic surfaces provide rigid, non-flexing outlets, and standard slotted or unslotted basin wastes with rubber or fibre washers compress evenly against the smooth ceramic surface.
Resin Basin Influence
Resin basin influence arises because resin surfaces provide slightly flexible outlets, and installers use thicker washers or supportive backnut pressure to maintain uniform compression without distorting the resin structure.
Stone Basin Influence
Stone basin influence arises because stone surfaces provide heavy, rigid outlets with minor surface texture variations, and installers use stronger sealant rings beneath the flange to compensate for micro-irregularities.
Glass Basin Influence
Glass basin influence arises because glass surfaces provide smooth but fragile outlets, and installation requires controlled tightening, soft washers, and protective spacers to prevent tension fractures during compression.
Composite Basin Influence
Composite basin influence arises because composite surfaces combine rigid and flexible structural layers, and installers match washer thickness and sealant type to maintain stable compression across the layered material.
Installation Outcome
Installation outcome depends on correct washer selection, accurate flange seating, and controlled tightening force, and these material-specific decisions ensure secure drainage performance for each basin type.
How Do UK Regulations and Standards Affect Basin Waste Installation?
UK regulations and standards affect basin waste installation by defining watertight sealing requirements, trap performance criteria, and overflow compatibility, and these rules ensure safe, hygienic, and compliant drainage in domestic bathrooms.
Building Regulations Drainage Requirements
Building Regulations drainage requirements influence basin waste installation because sanitary pipework must maintain watertight joints, stable flow paths, and correct ventilation, and basin waste sealing supports these drainage performance expectations.
Water Regulations Compliance
Water Regulations compliance affects basin waste installation because waste outlets must prevent backflow risk and maintain reliable wastewater discharge, and correct washer compression and trap alignment support this regulatory function.
Trap Seal Standards
Trap seal standards require water seals with sufficient depth to block odour escape, and correct basin waste installation ensures accurate connection between the waste outlet and the selected trap to maintain this seal.
Overflow Compatibility Requirements
Overflow compatibility requirements affect installation because basins with overflow channels must use slotted wastes to route excess water safely into the waste body, and correct alignment prevents internal leakage.
Material and Component Suitability
Material and component suitability influences basin waste installation because washers, backnuts, traps, and sealants must meet durability expectations under UK domestic use conditions, and compliant components ensure long-term performance.
Installation Quality Expectations
Installation quality expectations require controlled tightening, complete sealing, and verified leak-free operation, and these expectations align with UK standards that prioritise watertight performance in sanitary fittings.
Conclusion
A basin waste installation functions correctly when the waste type matches the basin design, the sealing surfaces are prepared, the washers and backnut are tightened in order, the trap connects securely, and every joint passes a leak test. Effective installation depends on correct overflow alignment, accurate washer compression, and controlled tightening that protects the basin structure. Material differences across ceramic, resin, stone, glass, and composite basins influence sealing choices and tightening force, while UK regulations reinforce watertight joints and reliable trap seals.
Common fitting problems such as flange leaks, washer displacement, and trap misalignment are avoided through systematic preparation and precise assembly. Installation cost varies with labour time, access constraints, and component condition, and professional support becomes necessary when complex drainage issues appear. A well-fitted basin waste provides stable, hygienic drainage performance and long-term reliability in domestic bathrooms.


